Re-keying Porsche 928 Locks

Nick Carrington, Gareth Croeser, Jon Holdsworth, November 2002

http://www.928.org.uk/mambo/content/view/56/43/

Hatch Lock


lock1


Procedure is moderately "involved" for the hatch lock. I'd assume more involved for the ignition! Anyone with some reasonable mechanical ability can do this - really. - It takes about 3 hours the first time.

Note: Some portions may slightly differ for the main key.


  1. Remove the two Allen screws and drop the lock out of the hatch.

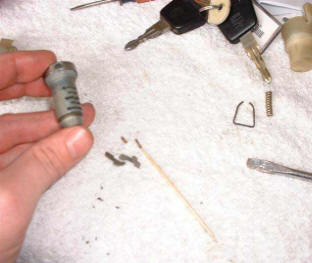
  2. Remove the mechanism to a work bench (strongly advise using a large, clean surface on a towel – as there are small parts).

  3. Drill out, or otherwise remove, two pins holding the cylindrical cap on the top of the lock and remove the cap, thus revealing the top of the lock barrel.

  4. Drill out, or otherwise remove, two pins at the sides of the lock at the top of the sloping cover. Remove the cover exposing the plastic cam mechanism underneath.

  5. Drill out, or otherwise remove, the pin in the side of the plastic cam. The cam will now slide off the end of the lock barrel.

  6. Put your WORKING key into the lock... If you don't, the whole thing freaking falls apart all over your garage! (Voice of experience).

  7. Slide out the mechanism from the housing, with the key inside. You will notice that there is an additional lock part that may or may not have come along as you pulled out the mechanism - This is the alarm-activating portion. You are now free to re-key.

  8. Re-keying: The basic idea of the lock is that there are several "slides" that all align (with key inserted) to make the cylinder spherical. The slides look like with key removed, the slides drop into two grooves on opposite sides of the housing to prevent the lock from turning. Each slide slides into the cylinder from only one side, and have a spring that pushes them into the grooves in the housing with the key removed.

  9. Each slide has a number on it. As you remove them, jot down the number on a note pad in case you want to re-assemble it as you found it.

  10. Slowly pull out your old key, holding the slides from utterly popping out - the springs only push SO far, so no worries. . .

  11. Put in your new key and note which ones (if any) align properly now. The rest simply need to be switched around until they DO align. They have to be switched with the key out, so repeat #2 above until you are close to done.

  12. OK - so you have two or three that just won't align?? Get out your flat file and convince them to align.

  13. Do the same with the additional two (?) slides in the alarm portion of the lock.

  14. Prepare the housing to re-assemble by going to your hardware store and getting two standard brass tumbler pins a size or two larger than your old pins. (You get these from the person who re-keys home-locks.)

  15. Put the collar on the EMPTY housing and drill your new (larger) holes into which you will nudge (not smash) your new brass pins. Try not to drill all the way through - it's OK if you do, though.

  16. Put the whole thing back together with a squirt of graphite lock lube (or WD-40)

  17. Test the thing out well! The alarm part should actively twist, but not with the shorter key.

  18. Nudge your new pins into place with either a small hammer, or better yet, use a vice grip to twist your pins into the housing. Well seated pins aren’t crucial, in fact, if you happened to drill too far, and went into the housing, you will interfere with the smooth turn of the lock.

  19. After the pins are in, get out your file again, and grind them down flush or semi-flush.

  20. Re-install, and have a nice day.

Door Locks

The non alarm Door locks have ten "tumblers" that are in opposed pairs so that the key will work both ways up. These tumblers are all numbered. If you are lucky you can rearrange the tumblers by trial and error to match the new key. More likely you will have to file down some of the tumblers to match the new key as you may not have sufficient. The door locks are easy to remove…

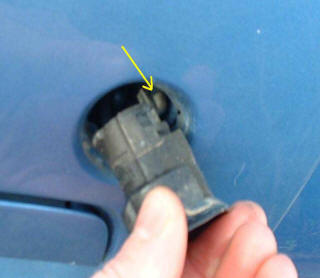
  1. Remove the plastic cap on the door jamb. (Yellow arrow above).

  2. Undo the door-lock securing bolt using an Allen key.

  3. Looking through the hole left by the stud pull the lock barrel about halfway out of the door skin and you should see the plastic "rod" that connects to the little ball on the back of the lock barrel. Using a fine flat bladed screwdriver slightly open the slot in the connecting rod into which the ball is inserted and gently pull the rod off the ball.

  4. Now pull the lock barrel out of the door far enough to disconnect the alarm wiring that is attached to the rear of the lock barrel. (Ignore this if you have no Porsche alarm system.) Tape the wires to the door skin to prevent them falling back into the door and getting lost.

  5. Working on a clean work surface and preferably somewhere where you will be able to find all the little bits that you will probably drop.

  6. If you have a key for the lock that you want to match to your other locks put the key in the lock and turn the key to the lock or unlock position.

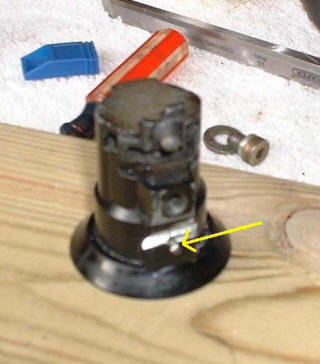
  7. Using a parallel pin punch, punch the two pins (about 1mm diameter) and about 4mm long into the centre of the lock. They can only be punched in when the key is inserted and turned. (These pins retain the cylinder of the lock inside the outer barrel.) The pins will then be loose inside the lock barrel and may just fall out - I can't remember so take care.

Note: If you are trying to fit a new/secondhand lock to which you don't have the key. Re-keying still possible - the only difference is that you have to remove the cylinder retaining pins outwards. Do this by sawing with a fine hacksaw blade at a shallow angle through the wall of the cylinder hitting the pin about 1.5mm down from the outside of the barrel. The pin can then be pried outwards using a sharp wood chisel.


  1. Using the key pull the cylinder out of the barrel.

  2. If memory serves me correctly you may have to use a short key to do this because the alarm bit of the lock actuated by the long key is a separate cylinder at the rear and does not come out of the front. It should be obvious when it is all in front of you.

  3. You should then have the cylinder with the key still in it with the ends of brass tumblers (little brass plates) just visible in the sides of the cylinder.

  4. When you pull the key out all the tumblers will fly out and you will loose them all! In reality they are probably all stuck in with congealed lubricant. Gently pull the key out - the tumblers will probably slowly ease themselves out of the cylinder until the springs have reached their free length. Prevent them falling out by putting you fingers over the ends of the tumblers.

  5. Put the new key (that matches the other lock/s on the car) in to the lock. You will then see which tumblers need to be changed.

  6. The non alarm locks have ten "tumblers" that are in opposed pairs so that the key will work both ways up. There are, I think, 10 possible tumblers of which your lock will use five pairs.

  7. The tumblers are all numbered. If you are lucky you can rearrange the tumblers by trial and error to match the new key. Keeping pairs together.

  8. More likely you will have some that work and some that won’t. When you have as many correct as possible, put the new key in the cylinder and file down those tumblers that remain proud of the surface of the cylinder.

  9. Using a toothpick, it is pretty easy to pull the springs out, to check and clean them.

  10. The cheating way to do it is just to put the new key in the old lock and file down all the tumblers to match. Both keys will then work in the lock plus maybe some others, but how many budding 928 thieves are walking around with lots of different 928 keys to try?

  11. Reassembly is essentially the reverse of the above. The little pins drive in from the outside of the lock though. Reconnecting the connecting rod to the ball on the lock barrel can be frustratingly awkward but it is possible.
     

Note: When rearranging the tumblers you will find some too high and some too low. The high ones will give against the spring and the low ones will feel firm. Swapping a high one with a low one is a quick way to get two the right height. You'll see what I mean.

Petrol Cap Lock

There have been numerous articles on various discussion groups both recently and in the past about self help with locks. I experimented at the weekend with my petrol filler cap lock as a precursor to having a go at some of the other ones on the car and was surprised at how easy it was to make one of my existing keys fit that lock. Here are the steps I followed:


  1. Separate the red cap from the white nylon screw down cap - just poke a screwdriver up between the red and white bits (3 push fit clips around the circumference) .S

  2. Now you can remove the lock assembly from the screw cap. It has two 'ears' sticking out of the sides and a sprung-loaded button at the bottom.

  3. Just up from the sprung loaded button is a wire clip inserted from the side which holds the cylinder in place. Remove that with a small screwdriver or similar.

  4. Push the top half of the cylinder out of the bottom half - it splits on a level with the two 'ears'.

  5. The lock barrel itself will now push back out of the top half of the plastic housing.

  6. Put in the key you want to fit the lock and rearrange the tumblers to suit - you may have to file the tops or bottoms off some of them. With patience I was able to find a combination that worked with no filing necessary. Beware there is a tiny spring under the shoulder of each tumbler, but they're not very strong so they shouldn't fly out.

  7. Reassemble. You will have to squeeze in the sprung loaded button to get the cam on the end of the barrel to engage in a slot in it.

  8. There are other similar posts for door locks on other forums. I hope this encourages some to try adjusting the locks themselves before spending £25 or more per lock for a new set.


------------------

The rear hatch switch is not riveted on. It is held in place with a flat plastic piece that threads onto the body of the switch. But before you can get to this piece you will need to remove the knob. As you notice the knob spins freely, but it is really threaded onto the switch. Looking at the base of the knob you will notice it is soft and when the knob is pulled up you can reach a pair of needle nose pliers under the knob and grab the shaft of the switch. This will allow you to unscrew the knob from the switch.

After that it is self explanatory

Re-keying a lock might be best left for a lock smith. Lock smiths can buy a package of tumblers. You can re-key the lock without a packet but you might not have enough of the right kind of tumblers to fill all the slots or some will be worn. The lock will work without all the tumblers in place and is probably not that less secure as a result. I think 928 international offers this service as well.

I do them myself. The trick is getting out the pin that holds the lock together. It is pressed in place. Driving it into the lock will damage the lock and make it unusable. Trying to drill it out unless you have a good drill and a drill press will cause you to go off track. It is also possible to drill too far and damage the lock.

I first use a file to dress the lock cylinder and get rid of the factory crimp. The pin is of a different material from the lock - brass so stands out although not all of the pins I have seen are brass.

I drill a small hole at a 45 degree angle in the body of the lock hitting the pin but not drilling all the way through it. I then take a pick and pry the pin up and out of the lock using a needle nose pliers to pull the rest of the pin out.

Using the key I then slide the cylinder out of the lock body. The key holds the little bits in place. You can then pull the key out and resort the tumblers to match the key you want. There are only four different sizes so there is a good chance of a pretty good match. If you have an old lock you can scavenge the old lock for extra tumblers or go to a locksmith and buy a package of new tumblers.

Getting the thing back together with the spring is a bit of a trick but patience pays off. The spring is there to make the lock spring back after it is turned. Be careful if it goes in wrong and don't force it as it can break the tab on the Cylinder and ruin the lock. If this is an alarm key you will have to re-key the tumblers in the alarm portion - it should be evident if you get to this point.

If you leave out a tumbler be sure to remove the little spring under the tumbler that is inside the key body. Failure to do this will cause the spring to fall into the works and mess things up.

If you are using worn tumblers sometimes the lock will not be smooth even though you have set everything right. For this I use a fine file to dress up the cylinder by filing the tumblers until the lock turns smoothly. This also works if you do not have enough tumblers and want to adjust one to fit.


A quick and dirty way to make a lock work is to put in the key you want and file the tumblers until they are smooth with the cylinder. I do not recommend this as you are destroying the tumblers and the next guy will be very confused. But it will work.

When putting the pin back in to hold the lock together do not push it in too far because it will mess up the lock and can do damage. I use a little J B Weld to hold the pin in and to fill the hole I drilled. It is a good idea to clean things up and use some graphite grease to make things work well.
Porsche used a congealing grease that will later in life make the tumblers stick and even get worn out.

Good Luck

Dan The Pod Guy
======

door lock tumbler removal


is there a way to safely remove the tumbler from my broken lock????
I have an extra lock but need to swap the tumbler so my key will work can anyone help
it looks like there are pins holding in the tumbler in how can i remove them without totally "f"ing up the whole thing....whats the trick???
Pvoth
----
Forget the locksmith; they will screw it up. The trick is to find the the small pin which is holding the tumbler from falling out. Drill a small hole adjacent to the pin, so that with a metal pick, you can pry the pin out.

The tumblers are interchangable left to right, but the body only differs by a small drain hole. Also the alarm switch is left and right.

While you have the tumbler out, it's a good time to paint the body of the lock. Spray with metal etching primer, and follow with spray epoxy paint in flat/satin black.

After you exchange the tumbler, tap the pin back in.
Borland
----
that's the ticket alright... I went down to my neighborhood locksmith and he told me what to do....also told them they should start caring blank and whatever they need to grind these strange keys......they couldn't get over how they key was cut... so I drilled a small hole next to the pin and was able to pry out the pins...

simple also I went ahead and swapped the whole thing..... my extra one looks better to make the key work in the other one I inserted the key and ground down/filed any "high" tumblers I reassembled and it works great I'm thinking that for you out there that have a key that doesn't unlock a lock just take it apart and grind/file down the high keys
Pvoth
-----
If I remember, I didn't have to drill a hole. I punched the pin out with a small punch.
Once out, I carefully laid out all of the little parts. Then removed the same from the other tumbler, and replaced them with the right ones. Basically, I just swapped the parts.
The 79 didn't need to be drilled. Just look for two small holes on opposite sides of the tumbler. If it has those, then you can push the pin out. Good luck.
----
On the 928's I've worked on, you can't punch out the pin from the other side.

Some locksmiths will re-key locks with fewer tumblers than the factory used.

If you take the tumbler apart, I strongly recommend you do so inside a plastic bag, as the internal springs tend to fly out and can be easily lost or damaged. You don't want to buy a whole lock just for a lost spring.
Borland

============

Another very good writeup (credits go to the Author):

Rekeying 928 Locks Procedure.docx

Rekeying 928 Locks Procedure.pdf