Porsche pull-down procedure, if the car is raised before the alignment.
Obtain actual vehicle height as follows:
- After the vehicle has been raised, starting at the influenced vehicle
height, pull the front axle down by 60 - 70 mm and hold for 1 minute. Use
special tool 10 - 222 A for this. Keep to the specified time.
- After releasing the vehicle, bounce the front and rear axles - approx. 25
mm - a few times.
(WSM 44-2 - Printed in Germany - XXI,
1989)
[10-222 A is an engine lift bar
spanning the lift rack and pulling down on the swaybar or the front transport
lugs]
Bill Ball
====
OK, just a bit of my primitive understanding of caster setting to clear up which
way to adjust the eccentric, the question I asked above.
As Jim indicated, we have positive caster, wherein the upper balljoint is
positioned behind the plane of the lower balljoint as shown here. Positive
caster provides straight-line stability and self-centering of the steering wheel
at the expense of some extra steering effort.
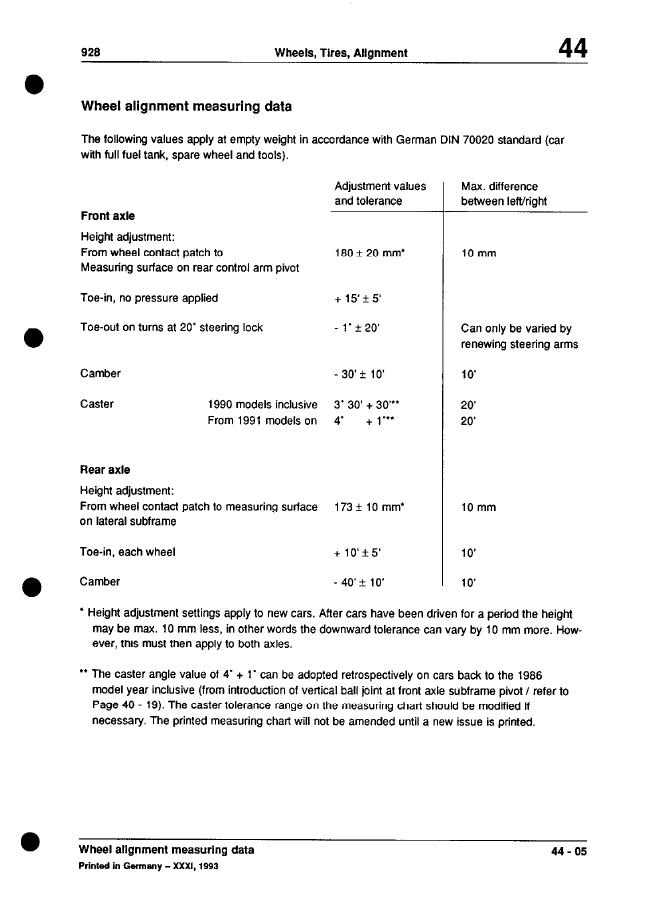
The spec for caster in the 928 is 4° +1 (so, max 5). A common observation is
that on many cars it is difficult to get caster down to the 4° spec. So, a
common solution is to set caster to the lowest value available common to both
sides. Make sure both sides are as close as possible to each other to prevent
pulling to one side. So, if one side will go down to 3.5° but the other will
only go down to 4.8°, set them both at 4.8°. Caster is measured indirectly by
calculating from camber at +20 and -20° turn-in, as described in Captain Earl's
guide and Jim M's detailed post above.
The caster adjuster in the inner (closer to the car centerline) of the 2
eccentrics on the lower ball joint carrier (unless you have an OB that happens
to still have the recalled aluminum balljoint carriers), as shown here:
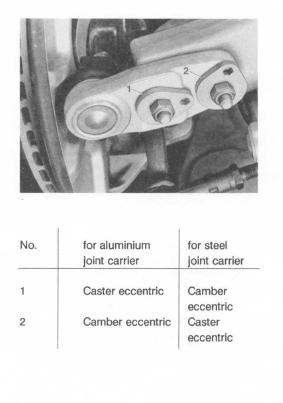
To get caster to its minimum, you would turn that eccentric so that the lower
balljoint moves as far rearward as possible. Note that changing caster will
affect toe, but not vice versa. So, if you make an adjustment to caster, go back
and redo toe.
Since this is a master thread, here are the standard alignment specs from the
WSM. You should align as closely as possible to the exact center spec if there
is a range and minimize side-to-side variations. That is not to say there might
not be special settings that differ from this, such as toe out for quicker
turn-in on the track, but it is very rare that these are desirable.
Bill Ball
====
I agree with the midrange recommendation where the spec shows a +/- range. For
caster, they give a target number and suggest a + variation only from that
target. FWIW, a larger amount of caster makes the car a little more sensitive to
road camber, but seems to reduce tramlining some, especially when combined with
correct and even camber adjustments.
The specs that alignment techs use seem to allow side-to-side variation between
the wheels, and that can easily lead to pull to one side or uneven tire wear. To
keep the car going straight and to minimize tire wear, it's very important to
have the right and left sides identical. For example, the WSM camber settings
would seem to allow one wheel to be at -20' and the other at -40' (one-third of
a degree negative on one side, two-thirds of a degree negative on the other.) To
get the car to track perfectly with the steering centered would require an
offsetting difference in caster; that would cause problems at steering angles
other than centered though. The conclusion is that you can adjust the wheels
within the factory tolerances, so long as they are both the same.
Dr Bob
=====
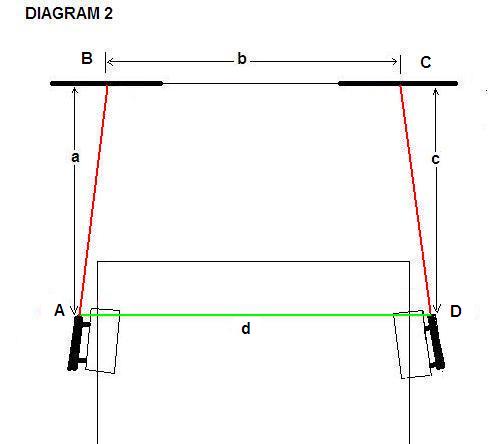
Here's a schematic diagram showing the lasers mounted on the front rims shooting
forward at two pairs of targets. The near targets are moved out of the way to
shoot the far targets. You measure the distance between the right and left dots
on the rear and the front target pairs. If you are toed-in, the laser dots on
far targets should be closer than on the rear targets. Diagram 2 shows dr. bobs
method.
You can plop the numbers into this on-line trapezoid calculator.
https://www.analyzemath.com/Geometry_calculators/trapezoid_calculator.html
I've labeled the diagrams above to correspond to the on-line calculator. Here is
a screen capture with some hypothetical numbers that happen to hit the spec.
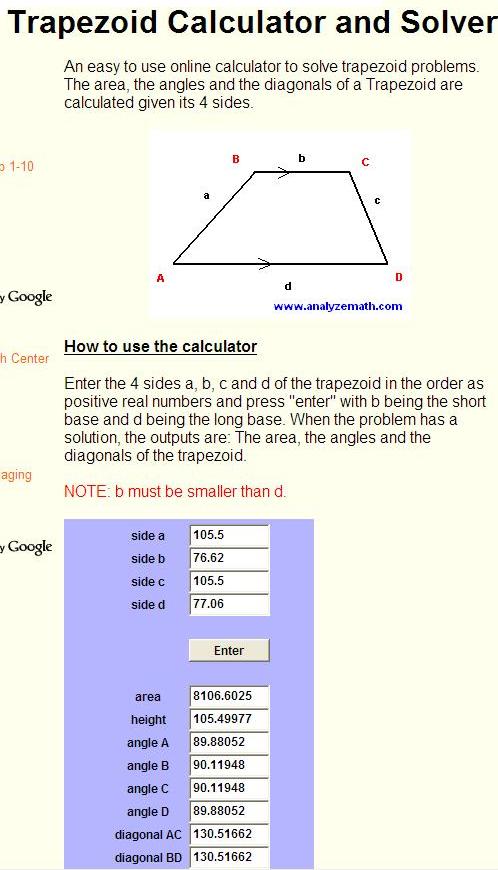
Note that I theoretically introduce a small error by measuring the distance
between the far and near target boards (sides a and c of the trapezoid)
perpendicularly rather than precisely from dot to dot. You could not measure a
difference between those two dimensions if you used a micrometer. It's just much
easier this way and the error is below miniscule (less than 0.001ş).
The adjustment itself is pretty simple.
- Roll the car up onto the turntables (and board for rear tires) or slip plates.
If you have neither, you will have to roll the car after each adjustment.
- Pull the lock pins on the turntables.
- Take your initial measurements.
- If adjustment is needed, loosen the 22mm lock nuts on the tie-rod outer ends,
near the ball-joint, counter-holding the tie-rod adjustment flat with a 15mm
wrench.
- To move toe from positive to more negative, the rear of the front wheel must
move outward. So, turn the tie-rod tube by the adjustment flat so as to expose
more threads and lengthen the arm. From behind the tie-rod, this would be DOWN
on the driver (left side) and UP on the passenger (right side). Be very careful
not to lose your bearings and turn the wrong direction.
The adjustment is pretty sensitive. If you are way off, as with the two cars I
mentioned, a full turn may be a good start. But after that, 1/4 then then 1/8
and 1/16 will be needed to get the toe on the money.
This is a simple approach that ignores some fine points, such as the effect of
driver load. You can account for those by weighting the front seat. For some
driving situations, you may not want factory spec toe-in, but that is an
exception.
Toe has the most profound affect on driveability, handling and tire wear of any
of the alignment adjustments. As was the case with the two cars, it is OFTEN way
out of spec due to improper previous alignments, from raising the car prior to
alignment. Make sure the suspension is settled and do any ride height adjustment
days before adjusting toe. If need be, apply the WSM procedure for drawing down
the front suspension, as mentioned in the first post in this thread. although
it's best to just avoid it.
__________________
Bill
======
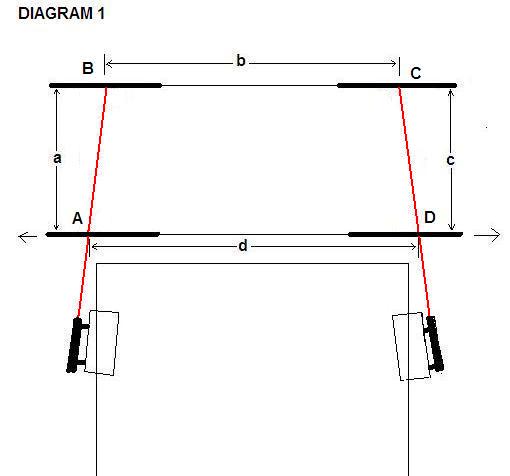
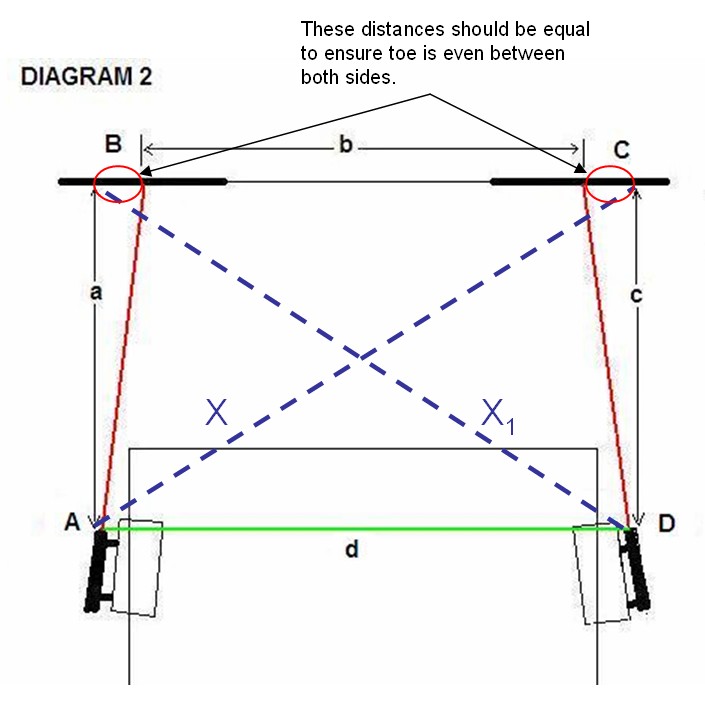
Using Bill's Diagram 2:
You would measure from point A to point C to come up with distance X. You then
compare this to distance D-B or as I call it X1. If X = X1, then you've got 90*
angles at ABCD.
Then to make sure you have equal toe on each side you would center distance
"little b" between points B and C.
Andrew Olson
===
Let's start off with the zero toe
idea. The reason that toe-in is specified is so that the wheels will be
perfectly straight when all the wear and play in the front suspension and
steering is preloaded while actually driving. If you have rigid pivots,
non-deforming bushings and perfectly tight ball joints and tie rods, zero might
be an OK static setting. You decide.
On to the geometry--
If the rack is centered (with the centering bolt is most desirable) and/or the
steering wheel is centered, a "toe in" on one side and an equal "toe out" on the
other side will make the car go straight down the road with the steering wheel
not centered.
The method that I shared early in the process uses a pre-calculated trapezoid to
help you set toe in. With your targets 84" apart, each 5 mins of toe is 1/8"
difference in width between the beams. For instance, I measured 30" forward from
the center of each wheel, and put a tape mark on the floor. Measured out 84"
from there, and put another mark on the floor in front of each front wheel. So
now there are marks at 30" from wheel center and 114" from wheel center, in
front of each front wheel. 4 Masking-tape tabs, in a rectangle, on the floor in
front of the car.
Now turn the lasers on facing directly forward (level, not down at the
ground...), and make a mark on each tape directly below where the beam passes
overthe tape. I used a carpenter's square, but you can easily use a plumb bob or
whatever you want, just so the mark on the tape is directly below the beam. Now
you have four marks. Measure the distance between the marks 30" away, and
between the marks 114" away. When you have the toe set correctly, the marks at
114" out will be 3/8" closer together than the marks on the 30" tape tabs.
That's for the spec 15 minutes (one quarter of one degree) of toe-in. If you
really want to start off with zero toe-in, the inner and outer measurements
would be identical.
If your steering wheel is straight ahead now when driving on a road that has no
camber/tilt to it, you can be fairly comfortable making exactly the same
adjustments to both tie rods as you get your toe where you want it. Borrowing a
little from the Earl Gillstrom bible, you can then turn the lasers towards the
rear of the car, and verify that the beams are equal distances from the centers
of the rear wheels on both sides. This assures you that the front wheels are in
fact equally adjusted and the front of the car will track with the axis of the
car going down the road. If they two distances are close but different, figure
out the average of the two distances there, and adjust the two tie-rods until
both distances match the average number you came up with. RECORD THAT NUMBER!!
If you can use the same fixture to check toe in the future, all you'll need to
do is verify that the beam distance at the rear wheels meets your recorded
average number, and your toe will be exactly the same every time.
I had a great phone conversation with Earl Gillstrom a while back, an finally
had a few minutes at home to implement his recommendations. The Biggest Change
is to the caster adjustments. Previously I had recommended that one should max
the caster adjustment, while Earl recommends that you start from the minimum
setting on both sides. I did a little research in the WSM, looking at the
pictures actually, and saw that the eccentric adjustment is not lined up with
the 'tab' that has the hex hole in it. The eccentric is 135 degrees away from
the tab. So my previous adjustment that seemed to work OK was really about
mid-ranged.
Yesterday's activity was to crawl under and adjust the caster to Earl's
recommendation for minimum. This means that the adjustment tab on the little cam
is towards the rear of the bolt 45 degrees towards the left side of the car. If
the car is pointing north, the tab will be pointing south-west if that helps.
Adjusting caster of course requires toe-in to be readjusted. I was a little
surprised to see that it was toe-out by 20 minutes after just that caster
adjustment. Using the laser fixtures it was very easy to get the toe back where
it's supposed to be. A short test drive suggests that the car is a lot less
sensitive to road camber (a Good Thing), but it still need just a very slight
adjustment to get it to track dead neutral. Just a little bit of caster adjust
on the left front will do that, along with another toe-in setting afterwards.
I may get over to the metal store this weekend for materials for laser fixtures
for those who have expressed interest. I did notice that the local Harber
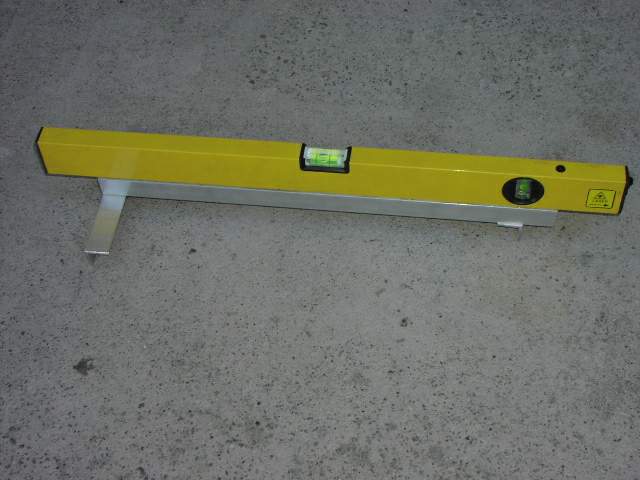
Freight stores are no longer stocking the laser levels, so I may need to get the
store manager to order half a dozen for me. If it's not one thing it's another!
Dr Bob.
====