The 1983-1986 928 Model uses an Auxiliary Air Valve to regulate idle control during start and warmup.
The Aux Air Valve (AAV) just allows air to bypass the throttle plate at cold
engine temps to help raise rpms/increase air flow/better atomize fuel.
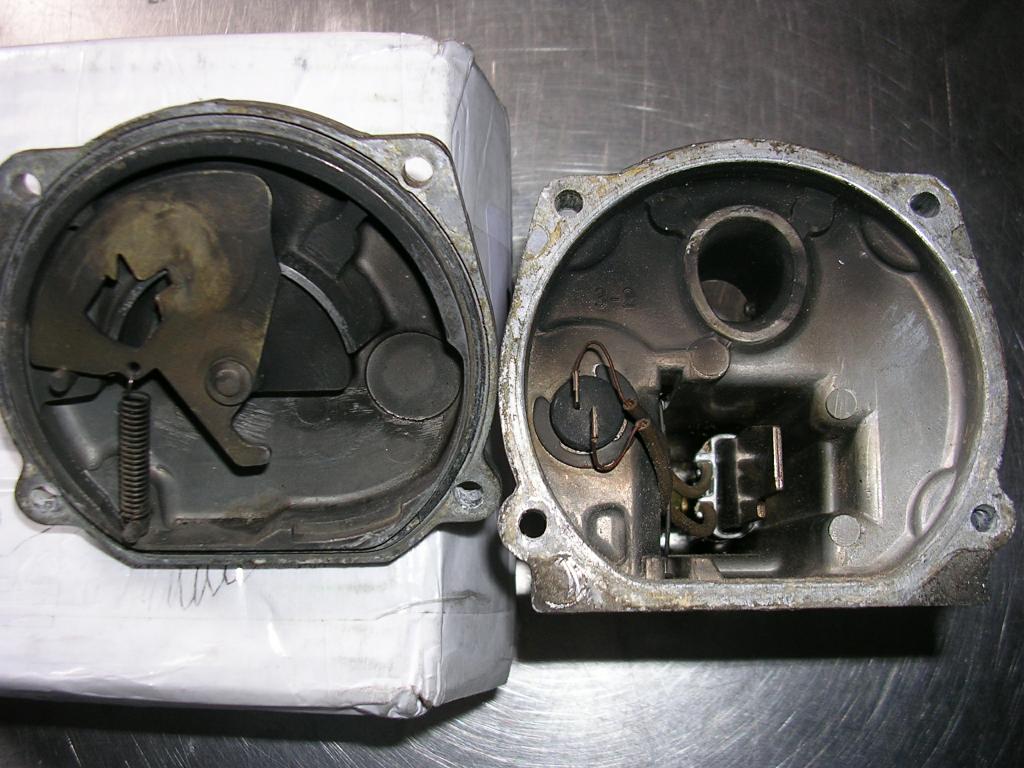
Your thinking is correct. I had to bend the strip about 1/8" to the right (in
pic). It is somewhat of a trial and error procedure to get the flap to fully
open.
The flap is odd shape (i guess) to allow varying amounts of air to flow at
various stages of warm-up. The flap never fully stops all air, as evidenced by
the last little square of opening in the flap.
===
I had another look at my AAV today and it all came back -
Looking at the long squarish part of the AAV you should see on one side toward
the end, a round plug/cover and on the opposite side, a smaller round recessed
piece. The smaller round piece is the end of a rod and the bi-metal bar assembly
inside is mounted to it. Adjusting involves driving that rod in or out. Looking
at the end of the rod at this point, if you were to drive it inward, that would
be closing the air passage more. If you want to have the air passage opened
more, the plug/cover has to be driven out the other side, then the rod driven
back from there, but before you do anything, get a measurement of how far down
the rod is located in case you want to put it back the way it was, later.
Anyway, to have the passage opened more, the larger plug/cover has to be
removed. That's done by driving in the rod from the other side to its' limit of
travel. Once that's done, the plug/cover will be sticking out about 6-7mm. You
have to remove it the rest of the way however you can, but carefully because it
forms a leak proof seal (to prevent a vacuum leak). Once that plug/cover is off,
you'll see the end of the stud that goes into the several times previously
mentioned rod. So, to have the air passage more open at cold startup, drive the
rod in by the end of the stud. To have it more closed, drive the rod in from the
other side (the flat, normally exposed end of the rod).
-But before you bother with any of that, have a look at the air passage opening
- should be -roughly- 1/4 open at room temp. Then throw it into a freezer for 15
min. and look again - should be maybe 1/2 open (I'm judging by what mine did in
a freezer that's set to about 10*F (-12*C) ) Then hook it up to 12v power and
see that it closes - mine took 10 minutes to close completely. If it doesn't
open/close as it should, remove the 4 screws and have a look inside. The
spring-loaded plate with the odd-shaped hole cutout should rotate easily on its'
pivot by finger pressure and return when you release it.
===
Driving the rod in. This part of the procedure looks the same whether you're
just moving the rod slightly to adjust the air passage to be more closed or
you're driving the plug/seal out the opposite side.
The plug/seal after being driven out ~6-7mm - needs to be carefully removed from
this point so as not to mess up the seal it provides.
Driving the rod back the opposite way by the stud&nut end. This is the way to go
to open the air passage more -
Interior view with the rod driven fully in by the flat, exposed end.
In this position the air passage would be less open at startup and would close
sooner on warmup.
Here, the rod was driven fully in the opposite direction (by the stud&nut end).
In this position the air passage would be more open at startup and would stay
open longer during warmup.
Checking the rods' depth. The reading taken previously and being shown here is
0.15" (3.8mm). I later adjusted it to 0.10" (2.5mm) to have it opened a little
more, hoping this will take care of an occasional problem with stalling during
warmup in cold weather.
Quick summary of moving parts -
Reassembly -
Make sure the side of the bi-metal bar and the "tab" on the rotating plate meet
up..
...which should leave it at a position similar to this -
....then rotate it to line up the screw holes -
===