This is an extract from rennlist, well documented by Jim Corenman:
The PSD pumps are impossible to fix, you're better off just sending it to me
and I'll toss it out for you :) :)
OK, seriously: It's just a pump, but the parts are tiny, the clearances are
precise, and nothing is replaceable. If you are able to work carefully and not
misplace any parts then there is nothing to lose.
You've got the pump off the motor, correct? And you found a drive-disc and a
mysterious pump assembly with no visible way to get it apart. Correct?
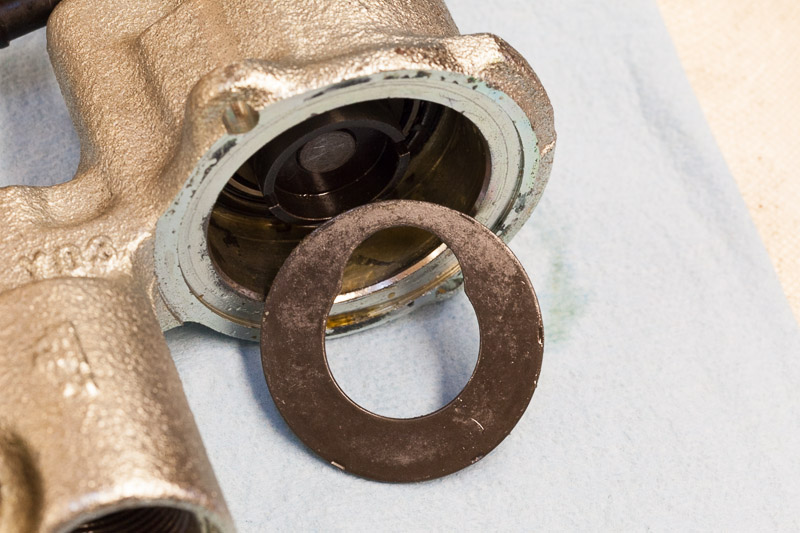
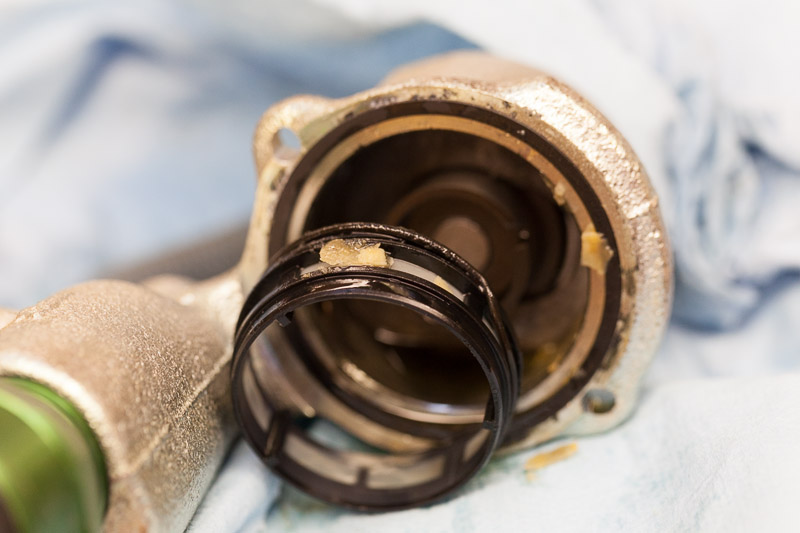
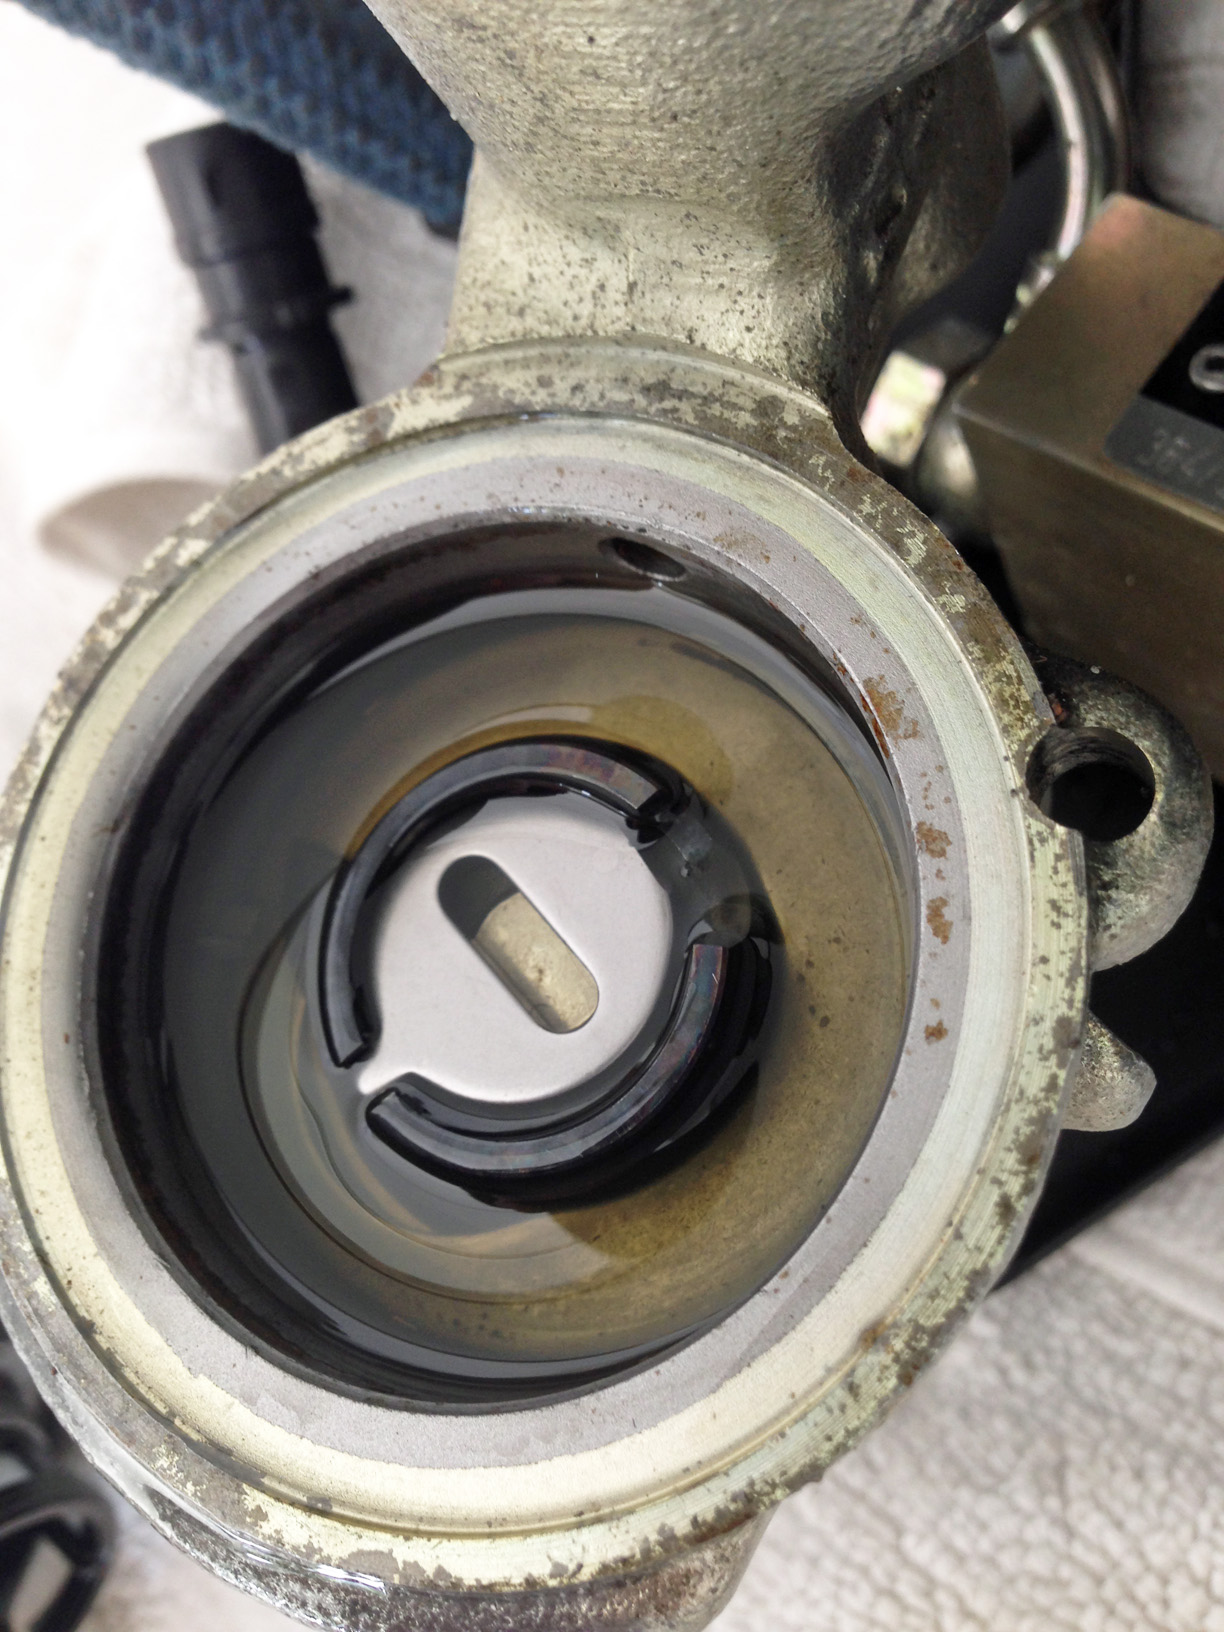
The thing you are looking at in the pump assembly is a plate. It has small marks
where it appears to be staked in place, but it will lift out with a small/strong
pick tool. Work carefully and don't bugger it. It is basically held in place by
the screen, which in turn is trapped in place by the motor.
This is what it looks like:
The secret stuff is all underneath that plate, and just (carefully, gently)
lifts out. Here are the next steps. Again, let me say that this is not a
beginners job. If you lose a part, you are done. If you don't get things clean,
you'll have to do it again. There is no shame in turning around here.
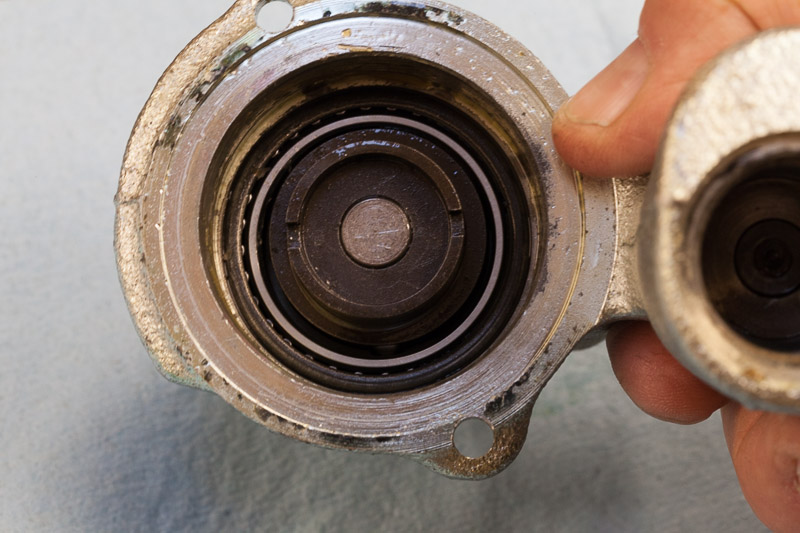
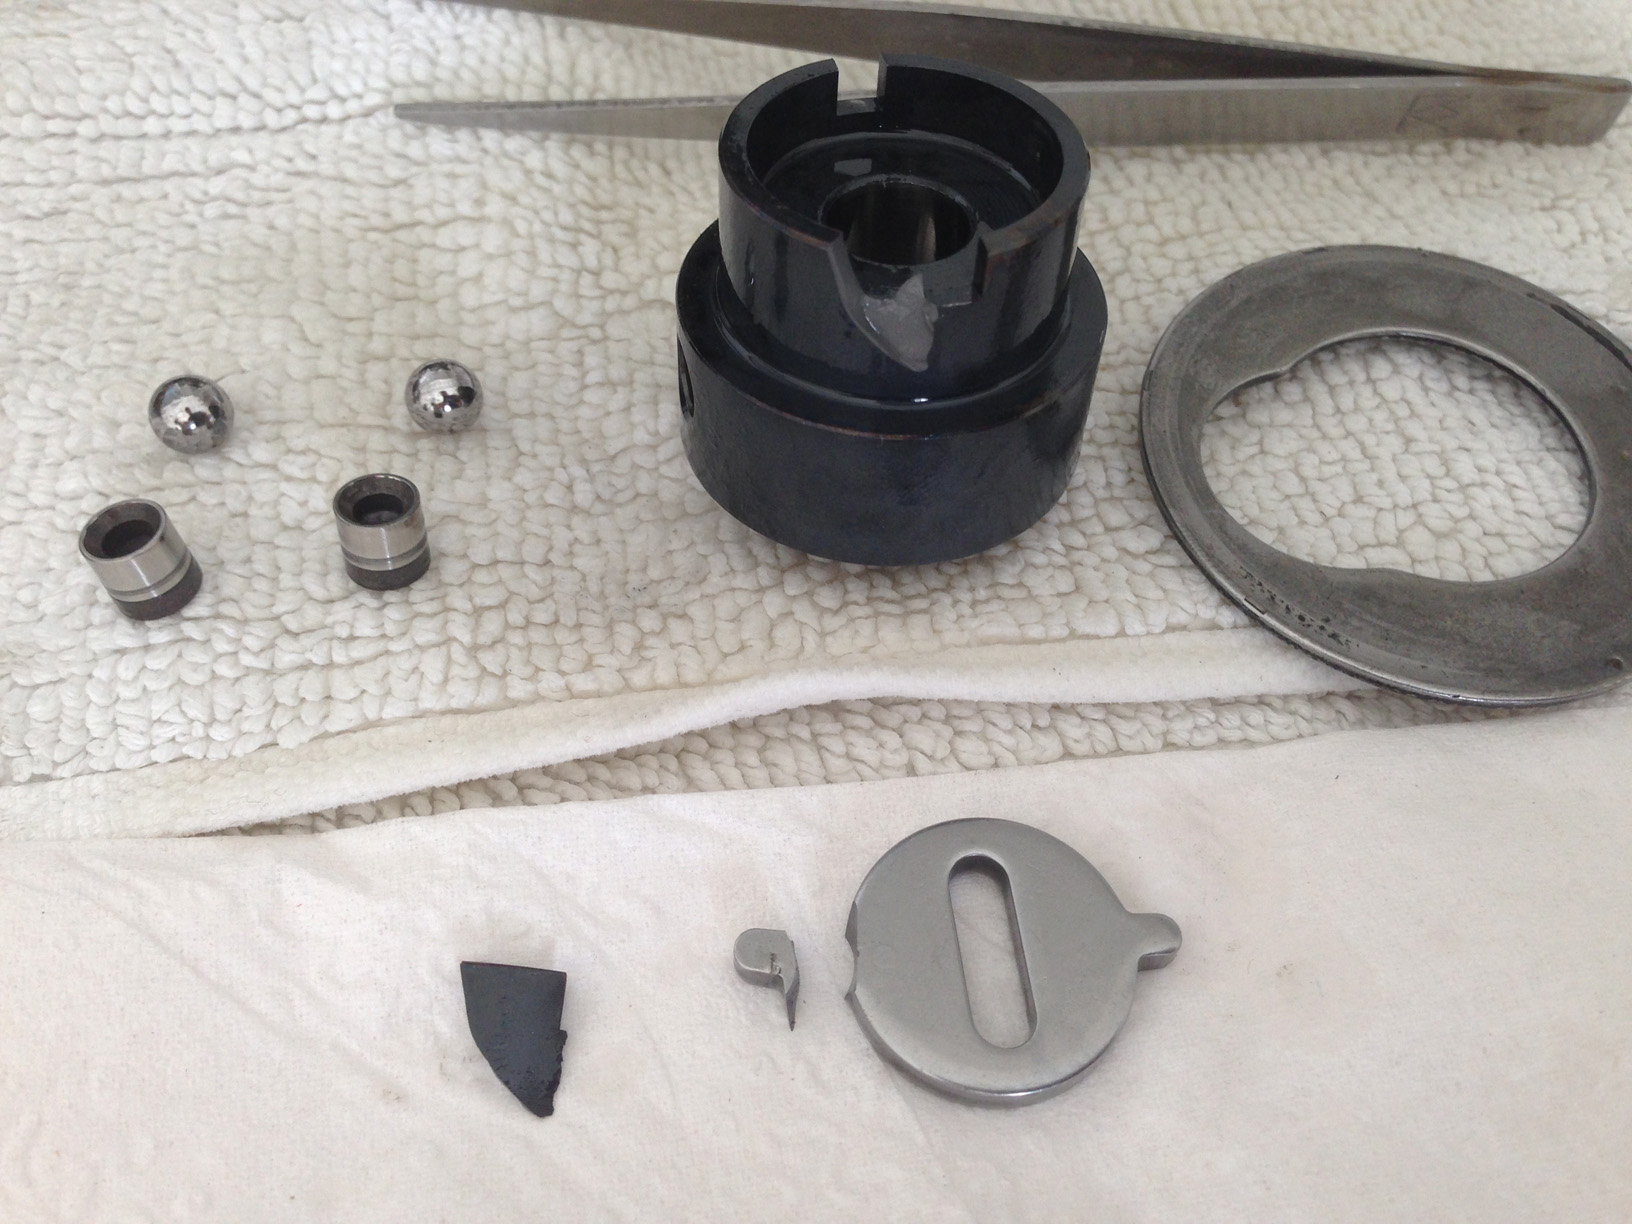
OK, if you insist on plunging recklessly onward, here is what you see with the
plate removed:
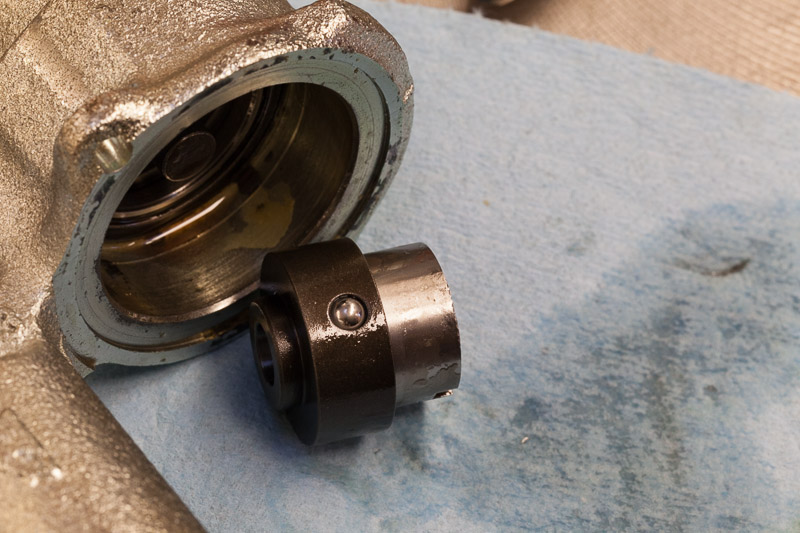
The center hub lifts off the (stationary) center shaft:
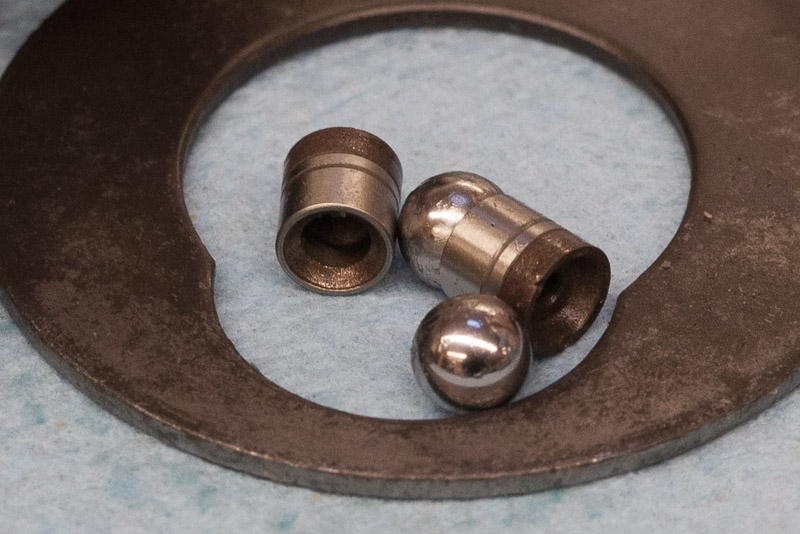
The balls and "pistons" push out from the center hole with an "L" shaped
dental pick (this is a good place for a cheap HF set, which can't scratch
anything):
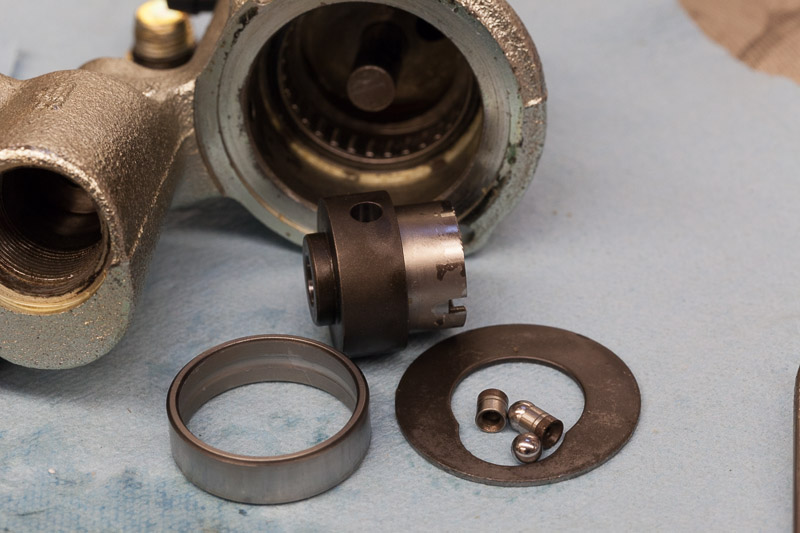
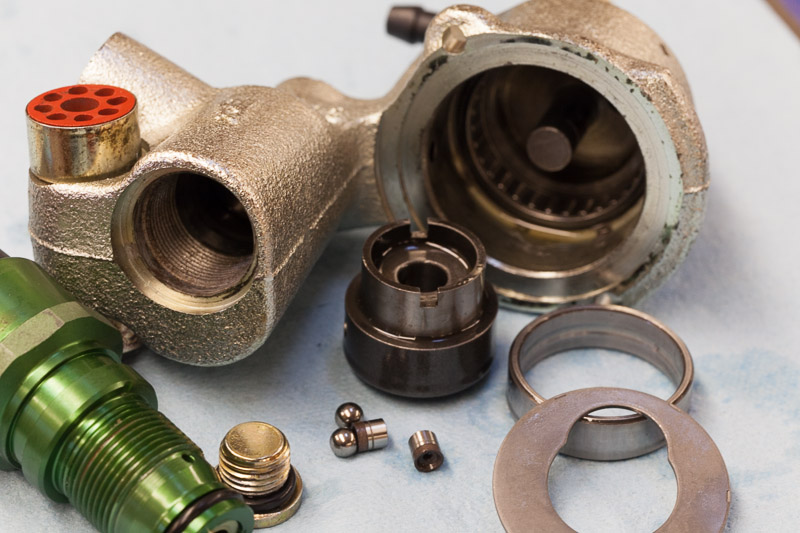
Here are the parts cleaned up and ready for assembly. You will need new
o-rings of course, just match what is there. I used calipers and McMaster Carr.
Did I mention "clean"? This is hi-pressure low-volume hydraulics, and the
clearances are really tight. The shadow from a piece of lint will bind things
up.
This one was not corroded but had a nasty white crystalline substance
everywhere, jamming the pump. So everything came apart for cleaning, including
the valve assembly, flush the lines, flush out the accumulator repeatedly, check
the slave (was clean), then reassemble and bench-test.

__________________
Jim & Sue Corenman
===
|
You mentioned bench testing. Can you please walk me through
that? I'm guessing you energize the pump for 15-20 seconds and make sure
the accumulator holds pressure. And then you bleed it off at the bleeder
valve on top of the locking solenoid valve. Or do you also energize the
solenoid valve? I bought a spare a couple months ago but haven't played
with it yet. |
===
I didn't do anything special, just exercised it a bit before installing. I
first ran the pump with the valve-body bleeder open, maybe 30 seconds or so, to
flush clean brake fluid from the reservoir through the pump. Then I repeated
that with the solenoid valve powered, to flush fluid through the valve. Then I
put a multimeter on the pressure switch and ran it again to build pressure just
until the pressure-switch opened. (You could also connect the motor in series
with the pressure switch, per the factory wiring). I let it sit for a few
minutes, checking for leaks and checking to make sure the switch stayed open. I
didn't want to run the motor without monitoring the pressure somehow, and just
watching the pressure switch was simple.
That all checked out, so I then installed it back in the car and went through
the bleeding process to the slave cylinder. Everything was clean there.
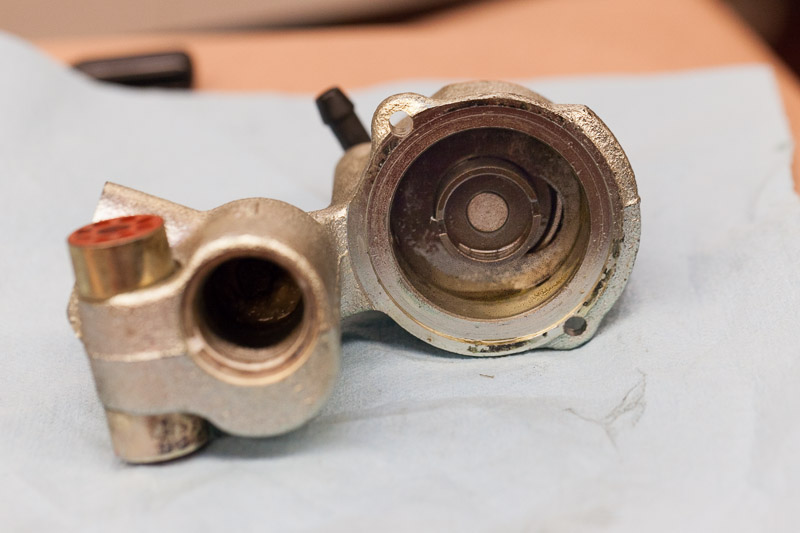
Here are some pic's of the crap that I found inside this pump (our '93 GTS which
had been sitting for a while). I didn't find anything that would simply dissolve
it. I should have paid more attention in chemistry class...
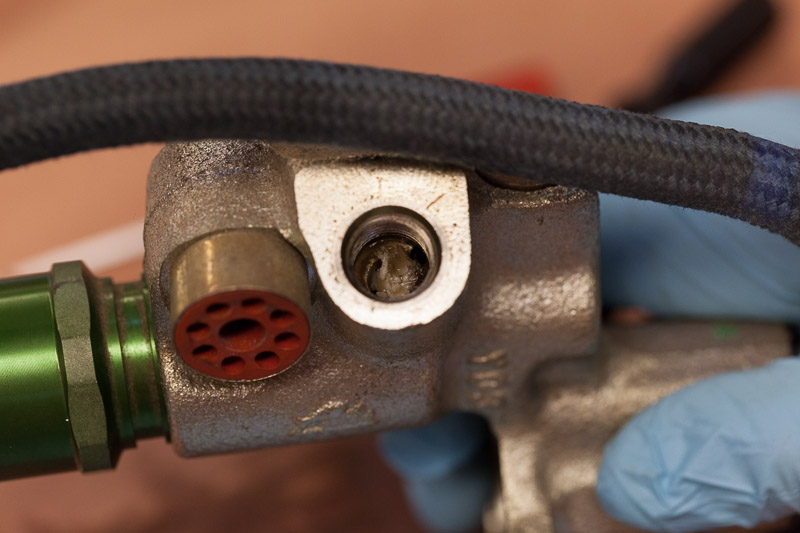
This is where the pressure switch goes, passages in the casting were also
clogged but the switch itself was OK. I took apart as much as I could, and
squirted brake-cleaner through all of the passages.
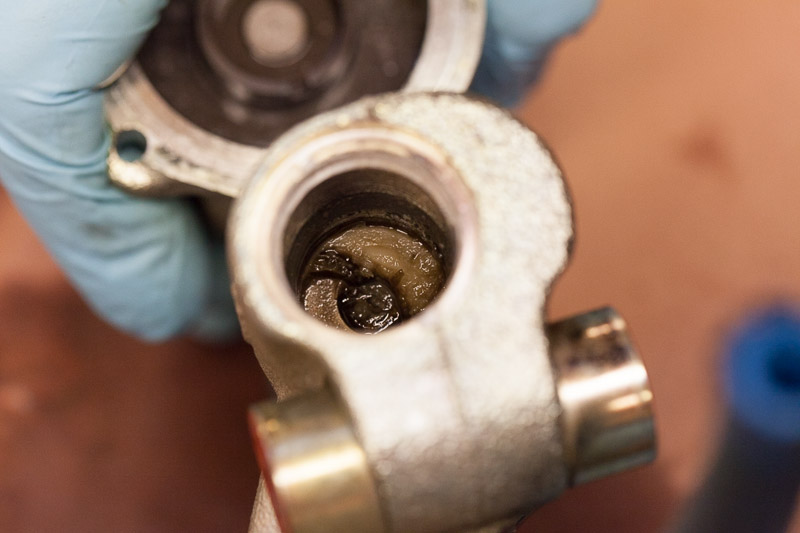
This is where the accumulator attaches, crud here and also inside of the
accumulator (squirt in brake-cleaner, agitate vigorously, drain, repeat until
clean).
__________________
Jim & Sue Corenman
======
Worth mentioning....these pumps are very tough to prime and begin the
actual pumping process.....because of the high pressure pump design. The pump
displaces tiny amounts of fluid...which is the only way they could get the
required pressure with that small 12 volt motor.
I've frequently had to add pressure to the top of the reservoir and disconnect
the line to the accumulator to get them to even begin pumping. Even doing this,
it can take many minutes for the pump to prime. Starting and stopping the motor
seems to help more than just continuous running.
__________________
greg brown
|
To be sure, At what end of the small cylinders do the balls
seat? on the "dark" one or on the "chromed" one?
When I took them apart, the balls were seating on the chromed side. Is
that correct? If not, Could that be the reason why the pump didn't work? |
I believe that you have it correct-- that the two balls seat on the shiny end
of the small pistons (see pic below). The shiny end should be a ground/polished
surface in order to seal (although it doesn't look that great in this pic... )
while the "dark" end is rough. Hopefully Greg can confirm.
|
Originally Posted by GTSR
Regarding the plate, It has a cropped sector in the central
hole. Does it have a specific position or could it be mounted freely? |
On ours, with the pressure switch at 12:00 (straight up), the cutout sector
was opposite at approx at 7:00 (see pic). I am not sure it matters but I
reassembled in the same orientation. The cutout is there to help fluid to flow
into the "intake" side of the pump, but the whole outer circumference is the
intake chamber.
Note Greg's comments above about priming, you want to run brake fluid through
the pump before firing up the motor. I just took some tubing and made a siphon
from the can, IV-style.
Cheers, Jim
__________________
Jim & Sue Corenman
========
The green item is the pressure switch. The gold item in your picture is the
magnetic valve that either sends fluid pressure from the accumulator to the
slave cylinder, holds pressure on the slave, or reduces fluid pressure on the
slave by allowing fluid to return back to the reservoir. The pump will not build
pressure in the accumulator and activate the pressure switch, shutting off the
pump, unless the bleed nipple on the magnetic valve is closed.
I don't think fluid should leak through the discharge port on the magnetic
valve as this would result in the slave slowly extending due to fluid pressure
from the accumulator filling the slave cylinder. Perhaps there is a bit of dirt
stuck in the magnetic valve causing the bleed through? The spool in the magnetic
valve has different positions depending on the amount of current applied just
like the valves in the ABS unit (same type valve.)
Try flushing fluid through the magnetic valve and slave cylinder to stop the
leaking of fluid to the discharge port of the magnetic valve. You might need a
Bosch Hammer to activate the "Pressure Reducing Phase" of the magnetic valve and
force fluid pressure to be relieved from the slave back to tank via the magnetic
valve. If the valve will not shut off tight it will need addressed.
Mike
_____
If air is in the PSD-system priming of the system can be kind of tricky as
mentioned on this forum before. The suction function of the pump is very limited
making it difficult to get the fluid into the system. The Workshop Manual tells
you to put some air pressure 1,5 to 2,0 bar (22 to 29 psi) into the top of the
fluid container.
I tried another method which worked very good. Connecting a Mityvac vacuum-pump
to the bleeder valve on the locking solenoid, the vacuum immediately made the
fluid to enter/prime the system. When the system was primed the
flushing/bleeding procedure was no trouble at all to perform.
Åke
====
Finally, gave up and sent the 90's PSD off to Roger. While I wait I decided
to pull my 90 GT's PSD and see if it work in the 90 S4 - it didn't. Pump never
shut off - same as 90 S4. What were the odds?
It was full of brake fluid foam that shot out of the bleeder valve when I
loosened it - shot across the shop - reminded me of an 80's porn film.
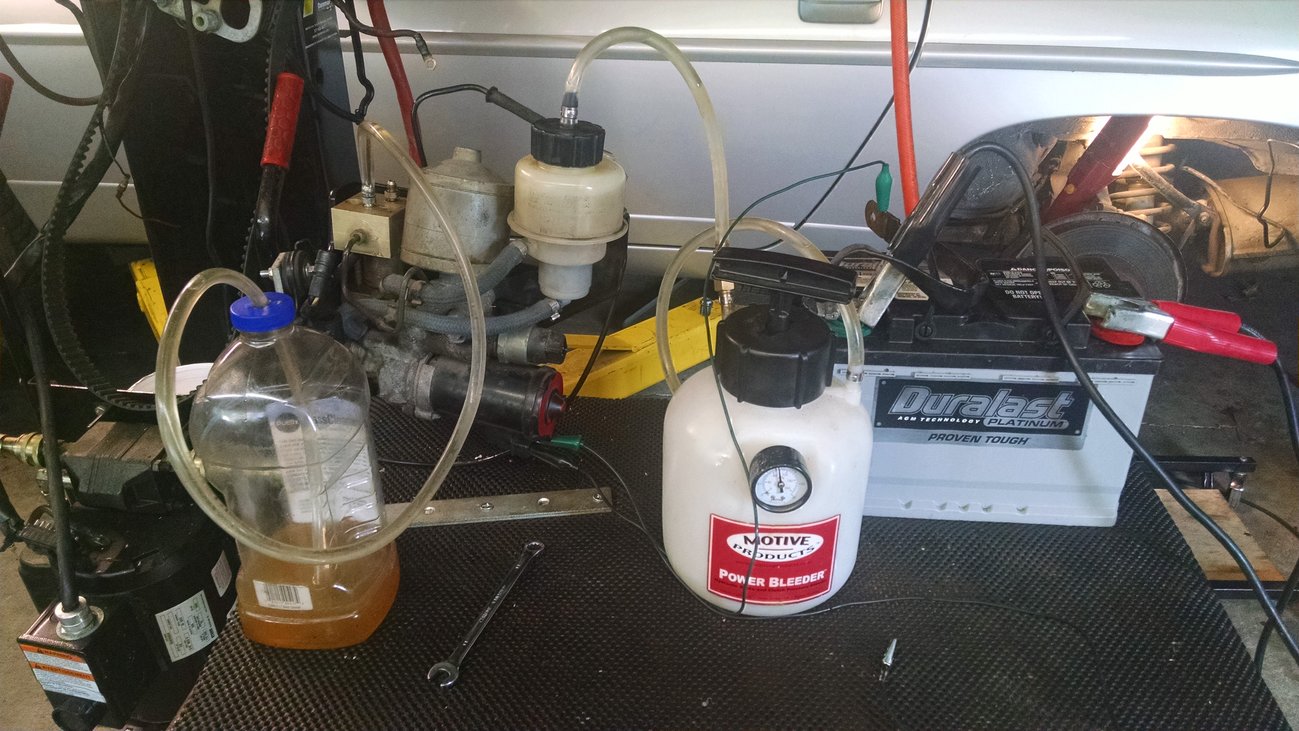
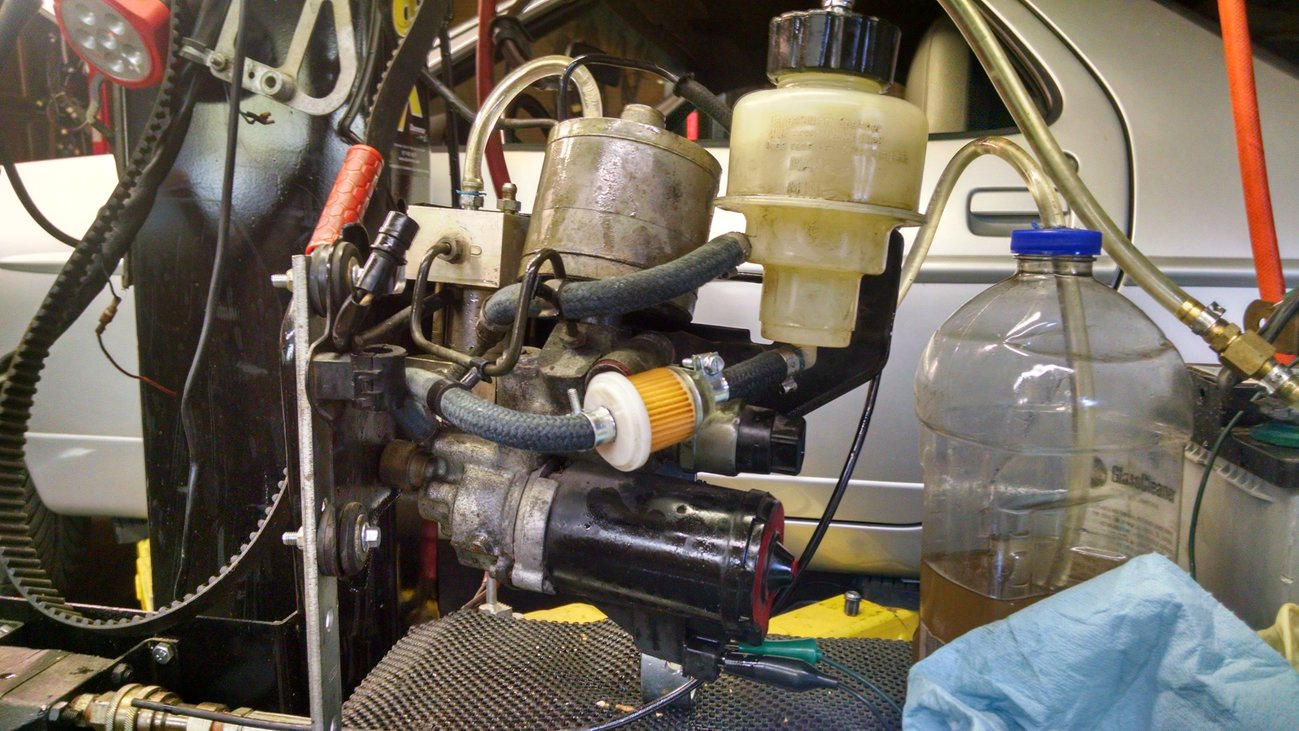
So, I built a PSD purposed test bench - complete with PSD stand and place for
battery, power bleeder and brake fluid catch bottle.
I used another bleeder screw to plug the orifice to the slave, pumped up the
power bleeder to 15 pounds tossed my battery jump box on the battery and applied
12 volts to the motor.
Lots of foam, had to keep adding pressure. But finally it cleared. I tightened
the bleeder valve and when I ran the motor within seconds you could hear the
motor start to labor. That is the first time I've heard that happen.
I'll put it into the 90 S4 today and see if I finally have a functioning PSD
unit free of error messages. No errors were logged in the PSD ecu error log.
Kevin
Released the bleeder valve and more bubbles and finally clear fluid.
Earlier and maybe in another thread Greg mentioned having to put some
pressure on the reservoir and it didn't occur to me that he meant a power
bleeder or something like that. The ah ha moment was the realization that the
power bleeder fit the reservoir. ( d'oh! ). That, in concert with stepping up
the voltage with my jump box on the battery, seemed to yield the results.
Kevin in Atlanta