Front Shock Replacement
--------------------------------------------------------------------------------
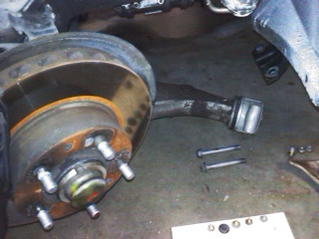
Replacing the front shocks on my '91 GT this week. As far as I know these are
original equipment shocks with 70K miles on them.
Sorry in advance for the small photos. I took them with my cell phone and
forwarded them to my email account which reduced their size instead of blue
tooth transfer to the laptop. Unfortunately, I deleted the originals off the
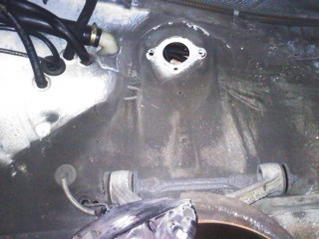
cell before realizing this. 2nd photo is up into the well looking at the top
mount after the lower arm has been dropped and the shock removed.
After some research on this forum (thanks to those who have gone before me!), I
approached this job in the most straight-forward method I could determine. I
decided that calipers could remain installed:
1. Loosen lugs on front wheels
2. Jack car at rear jack points and install jack stands
3. Remove wheels
4. Remove the wheel liners from inside each wheel well
5. Remove nut on bolt at base of shock with 19mm socket/breaker bar (wrench on
other end of bolt)
6. Knock bolt out of bottom stanchion of shock (guiding sway bar linkage)
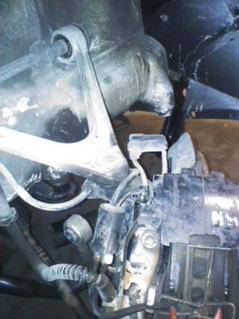
7. From above, remove the 3 shock mounting bolts in the engine compartment
8. From below, using a 17mm socket on short extension, remove the 4 bolts (2
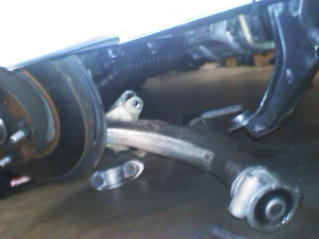
front, 2 rear) holding the large U-shaped brackets at the back of the lower arm.
9. A small tap on top of the lower arm at the back and the lower arm falls away.
10. At this point the shock and spring assembly can simply be rotated and then
the top tipped out and up through the wheel well and removed from the call.
It took maybe 20 minutes on the first one, and about 10 on the second.
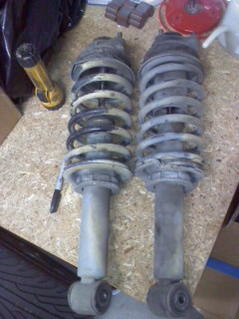
Initial inspection reveals two concerns:
1. The Boot ( 928.343.507.03 ) on the driver side shock is completely missing
2. The rubbers on the Concave Washer Upper (928.343.047.07) are debraided
Tearing them down to inspect for further issues.
-----------
The torque specs on those two bolts in the engine compartment 103 ft lbs
I can't budge these things holy cow! Mine are 23mm I think.
-----------
One thing that helped me get them loose is an old 1/2" drive breaker bar I
inherited that has been cut down to about 10". Once I got it and the socket onto
the driver side nuts it was easy to slip the box end of a large wrench over the
end of the breaker bar and get enough leverage to break the nuts loose. A 1/2"
drive palm ratchet sped things up as well. The passenger side was pretty easy
from under the car as I don't have an air pump installed.
Mike
-----------
As Carl says - 1 each side crack them from above - the other pair from below.
Then to undo them it's easiest to attack the rear bolts by putting your arm up
the front of the cross member and the front bolts up the rear of the X member.
Sorry I can't be more specific as II haven't done it enough times to remmeber
exactly how - but last time I had all 4 undone in about 15 minutes.
I don't have a ratchet spanner in the right size (22mm IIRC) but what I find
useful is a 72 tooth 1/2" ratchet that has three separate handles - 6" 12" and
24" and the ratchet bit is about 4" long with no handle attached.
Jon in OZ
----------
The fun part is when installing to get a torque wrench on there. Wiggling around
to get that one more 'click' on the ratchet of the torque wrench. Scraping your
hands and trying 13 different positions just to wind up in the original position.
Man, good old times
Aryan
----------
mine needed about 5 feet of leverage to break the bolt.
I removed the stud, as I replaced the bushes, and reinstalled with a new bolt
and the nut facing out.
Nigel
87 S4 Marine
----------
I installed these control arms last year. This job is done much easier on a
hoist, but can be done on jack stands. The job was done with the engine in the
car. I would suggest a press to remove the old studs to install in the new a
arms. It save time and ALOT of hammering on the studs. Very happy with the end
result.
A note to lubricate all remaining bushings as the suspention tightens up and a
suspention creak can develop. Once the bushings were lubricated the creak was
gone.
__________________
Dave