
Total data overview from various compressors: Compressors data.pdf
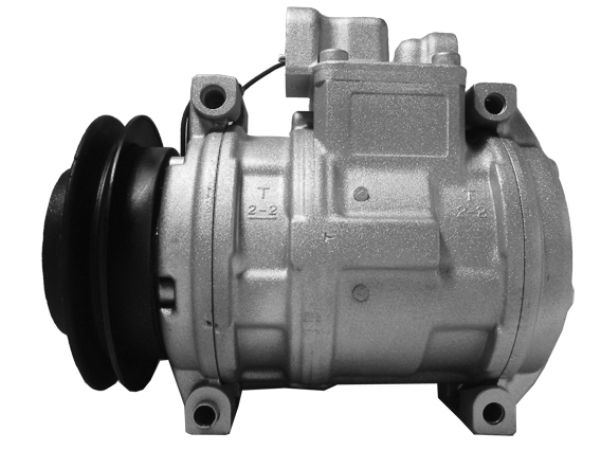
1992 928GTS compressor
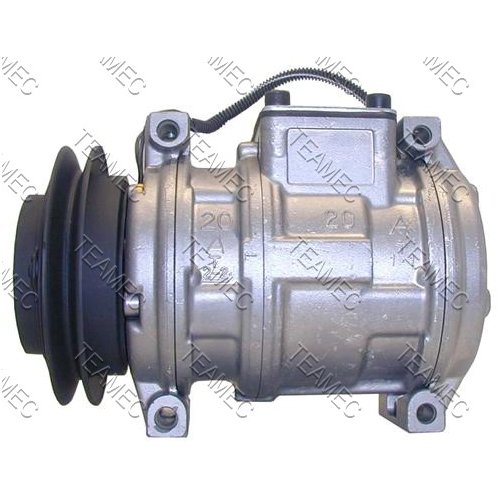
Kompressor, Klimaanlage PORSCHE 928
Artikel-Nr.: G945476/13178
OE-Vergleichsnummer: PORSCHE: 92812611301,
PORSCHE 928 5.4 GTS
ab Baujahr : 07.1992
Producer: DENSO
Compressor-ID: 10PA20C
Compressor oil: PAG 46
Oil volume: 210 ml
Clutch: with belt pickup
Belt disk-Ø: 126 mm
Belt Ribs: 1
Voltage: 12 V
Fits: 928GTS
=============
http://www.acsource.net/xcart/home.php
http://www.pelicanparts.com/techarticles/911_Nippondenso_rebuild/911_Nippondenso_rebuild.htm
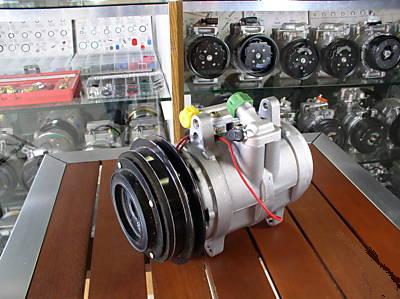
1992-1995 928GTS
SKU: Compressor for 1992 Porsche 928 (5.4 V8 Gas FI)
Nipp; 10P15E
6 Gv .570 X 4.92; 4 Ear
SKU: 127489-P/N: 902-027
1991 928s4/gt
SKU: Compressor for 1991 Porsche 928 (5.0 V8 Gas FI)
Nipp; 6E171
1 Gv.7 X 6.0; 6 Ear
SKU: 127475-P/N: 15285
1985-1990 928s4/gt
SKU: Compressor for 1990 Porsche 928 (5.0 V8 Gas FI)
Denso; 6E171
1 Gv; 5 Ear Mt
SKU: 127467-P/N: 471-0122
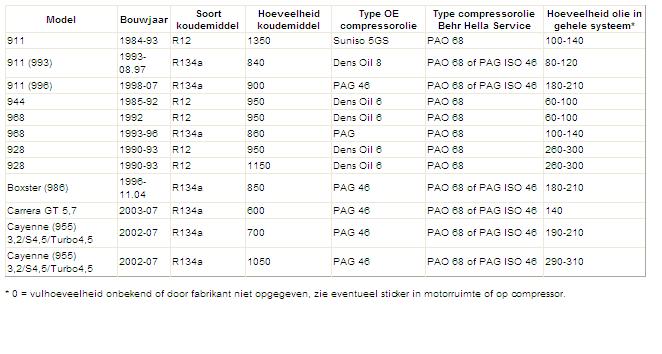
The correct oil filling of the Porsche used AC compressors:
The compressor is a Nippondenso 10PA20C (Porsche P/N 928.126.113X) used on the
'90 and '91 only.
http://www.acsource.com/index.asp?PageAction=VIEWPROD&ProdID=394
http://www.acsource.com/index.asp?PageAction=VIEWPROD&ProdID=100
I fix these in the uk. We are only allowed 134a so that's it, but I get 100%
success. Your problem is knowing where the leak is - I use a special gas and
overpressure with N2 then use a sniffer. Excellent results but a lot of kit for
a one off. The dye is crap and will only tell you if you have a big leak, it
gets everywhere and really pisses me off. Don't go there. If you want to pretty
well guarantee a leak free system, you have to change the condenser, hoses,
rebuild compressor, new expansion valve and new filter dryer. If you do all of
that you have magically replaced all the 'o' rings too. The evaporators (in the
cabin) rarely go, but if they do its a complete dash out job.
Most common leak points are the condenser mounting area (the bolt frets the
bottom of the matrix and eventually wears through. No notice, but dramati, the
metal to metal joint on the suction hose (engine side of the rad), the expansion
valve adjustment 'o'ring on the later valves (S4) and the compressor seals. Seal
kits are quite cheap and it is not rocket science, but dismantle the swash plate
over a sucepan as ball bearings will fly everywhere. All the parts are available
from SunAir. Very early 928s ('79 - 81)had Bosch/Behr compressors. Actually very
good, but difficult to get bits for and very heavy. S,S2 and S4 up to '90/'91
use Denso 6E171, and '91-on use Denso 10PA20C. The 6E has 3 pistons, the 10PA
has 5 and is lighter, and the hoses are almost twice the price and only
available from Porsche - unless anyone else can tell me differently.
Re-gassing should be done by someone who understands the system as they are all
slightly different, and although I start by putting a weight of gas in, the
final adjustments are by experience. Don't ask me why, but thats the way it is.
I have done about 25-30 systems now.
Richard
You most likely have a Nippondenso brand 6E171 model compressor.
A one day total leak down is a significant leak that usually can be found.
You could do a simple inspection for the common leaks in the 928, starting with
the high side hose (compressor to condenser) looking for signs of dirt
collecting in the oil that may have been pushed out with the refrigerant; check
closely where the hose is crimped (ferrules) to hose end fittings. Next, as Zeus
suggested, consider a nose seal leak by looking again for dirt and oil
accumulation around the clutch/pulley. The next suspect on a single evaporator
shark is the expansion valve, however start your inspection at the drier and
check for the rubber hose joint in this metal line prior to the expansion valve.
When you get to the valve you are checking the inlet line port and also bellow
“cap” on the valve; which we have found to be suspect at times.
If you have a friend nearby that has either dye & light detection tools or a
refrigerant electronic sniffer this would be your next avenue to finding the
leak. You could drop in a can of R134a and check out and sniff the system
components and joints. Otherwise the last step is to simply pay a tech to find
the leak and give you quote to repair.
If the source of the leak is the compressor, the 6E171, if not worn out
(pistons, wobble plate, ball and shoes), is not too difficult to reseal. You can
simply zip off the shaft nut in front of the clutch with an air gun, remove the
clutch assembly with common snap ring pliers (watch the shims for setting the
air gap in the clutch), tap out the key out of the shaft, remove the compressor
assembly bolts with a 6 mm allen hex. They most likely will be residual ac
refrigerant oil hiding in a cavity or two in the compressor. Before you clean it
out inspect the oil using magnification to check for signs of metal
contamination. If you find any they you most definitely want to liquid flush the
lines, condenser and evaporator.
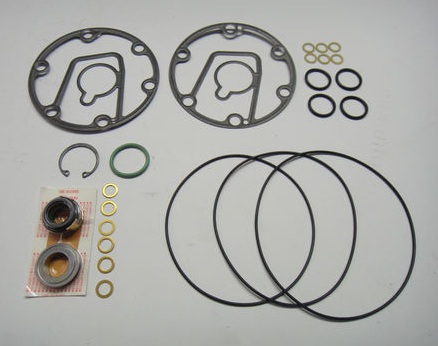
You’ll be replacing the front nose o-ring, center case halve o-ring, rear head
o-ring and shaft seal, front and rear reed plate gaskets (if the compressor has
not been resealed before then most likely these gaskets will be bonded to the
reed plates; get some liquid gasket remover and be careful not scratch the
mating surfaces on the nose and head. If the reed valves are pitted, corroded or
rusted you’ll have to think about replacing them (not usually included in retail
“seal kits”) if you can’t clean them up. The rusting or pitting is related to
moisture in R12 systems.
Inspect your shaft where the nose seal makes contact with it. If it is rusted
and depending upon how much pitting is present you maybe or may not be able to
salvage the shaft. When you replace the shaft seal assembly note the orientation
of the flats on seal assembly with respect to the flats on the shaft.
When you split the center section try to keep the shaft and pistons in either
side or they will fall apart and leave you pondering for awhile, so keep the
shaft with pistons on either side. Check the piston rings and the cylinder bores
for wear, though not common a 6E171. Inspect the ball and shoes on the wobble
plate as well as the wobble plate for excessive wear, again these items as not
included in the typical retail seal kits.
The 6mm hex head assembly bolts are torque’d to 18 ft lbs. The air gap for the
clutch should be checked, .020-.030" works nicely however you could stretch it
to .040".
Overall you can reseal a 6E171 without dedicated tools if you take your time.
You’ll need to add refrigerant oil to the system and usually 6-8 oz works fine.
Depending upon how old the drier is, what refrigerant oil you are using, signs
of contamination, etc. you will probably want to replace the drier for good
measure since you are going through all this effort.
When its time to charge the system, again you need equipment or a friend to work
with you if they have it, otherwise just take it to your favorite ac tech (don’t
forget to tell the tech how much oil you may or maynot have put back in the
system). Evacuation times vary depending upon the system capacity, altitude and
ambient air temp, however since you got all the time in the world I would
suggest 1-2 hours. If you are converting to R134a or sticking with it, the
general rule of thumb is about 85% of the original system weight of R12. However
the final amount or adjustment is based on P&T (pressures and temperatures
chart).
You may find some places on the net that sell seal kits out there and you may
find a few posts here and there on the 6E171 R&R (alike model was used the 944
and the old Lincoln’s).
The two primary rubber hoses on a shark single evaporator system are the
compressor and to condenser and compressor to evap pipe. I believe there is a
short section of rubber hose in the drier to expansion valve however this does
not leak often.
Griffiths