There have been some questions in other venues on this subject lately ....
Perhaps this would be a good point to insert a test method that can save a lot of hassle in testing the HVAC vacuum system on the later automatic systems.
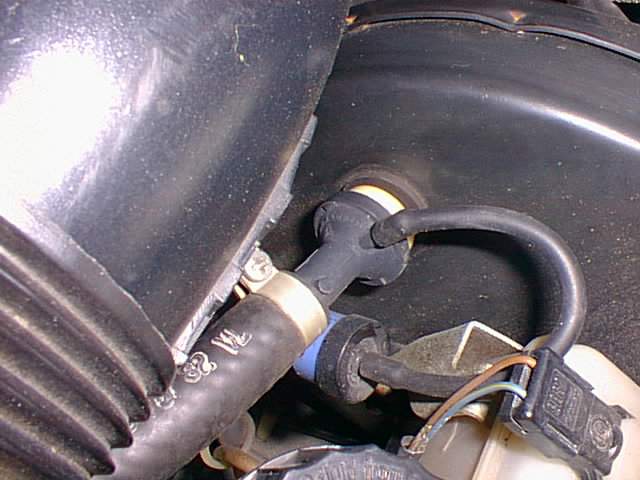
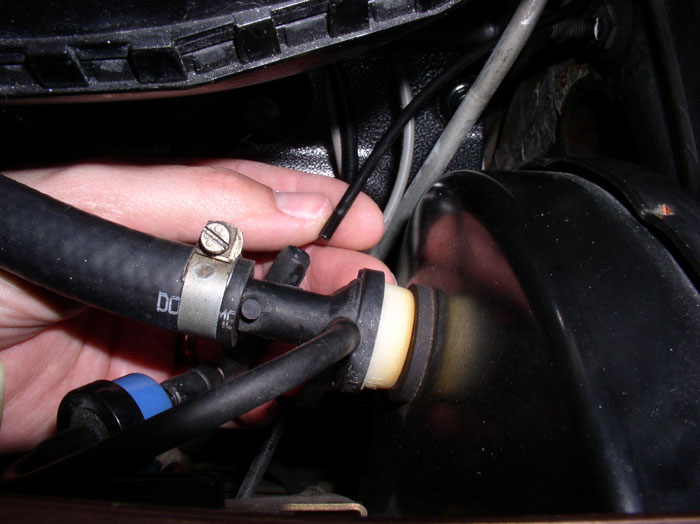
First, look under the hood at the power brake booster, and find the little vacuum line running off of the large vacuum check valve. A few inches down that line is a black/blue drum - this is the vacuum system check valve. With the engine running, check the vacuum on the line going into the check valve, and the vacuum out of the check valve - there should be only about 1" less (usually around 15 - 17") out of the check valve, and the hiss should be very similar.
 928.537.361.02
A few more inches down the line should be a four-way rubber cross. Check it for splits and leaks. One leg is usually plugged, one runs toward the left front fender, and one black line runs into the firewall.
Check the line going to the fender for leaks - it will take a LOT of pumps to pump this down, as it runs to the vacuum reservoir, and on earlier cars, the cruise control servo. You can use the engine to pump it down, and try to switch the line to the vacuum tester as quickly as possible to make this easier.
If the vacuum source and reservoir are good, remove the console side panel on the driver's (USA) side. Look just by the driver's right ankle, and find a bundle of colored plastic lines. These lines run to/from the vacuum system valve manifold, which is just visible mounted in front of the radio.
The black line is the main supply line, and the point where it plugs into the end of the manifold is visible. Make sure that it is plugged into the manifold. Remove it, and crank the engine. There should be at least 15" of vacuum on the black line. Replace it and shut the engine off.
If you still have problems, you can test the vacuum actuators. Using a sharp knife, cut the orange line that feeds the central vent actuator (this is the most common failure point in the system). Using a MityVac or similar tool (or suck on it if you don't have anything else!), make certain that the line that runs up to the actuator will hold vacuum. If it does, use a rubber tube to reconnect the cut ends of the orange line. If the line to the dash doesn't hold vacuum, plug the line that comes from the manifold - no need to plug the end that runs up in the dash.
Repeat on the yellow (footwell), green (defrost) and blue (recirculate/inlet) lines.
The white line feeds the heater valve - you don't want to just plug it, you want to have the heater valve working. If the white line doesn't hold vacuum, remove the air cleaner housing and check the heater valve. If it doesn't hold vacuum, replace it - it's cheap, about $12. The black side goes toward the block.
The blue line to the recirculate / inlet flap is another critical device. If this actuator is bad, you can't shut off the air flow, and you get no recirculate on the air conditioning. Before you pull the blower motor to replace this actuator, check from below (over the passenger's feet) to make sure that the flap isn't just sticking. Keep an eye out for crushed, collapsed, or broken vacuum lines as you work on various areas of the car.
When you finish, and have no vacuum leaks, the HVAC system should work much more efficiently.
When you get ambitious, you can order new vacuum actuators to replace the leakers, and start the major disassembly needed to replace them.
Wally Plumley
928 Specialists
====
The check valve allows air to be sucked out of the reservoir by the engine
under low-load conditions, like running on a trailing throttle. Without the
check valve, pressure the reservoir and the rest of the vacuum system for
climate control on all cars, along with cruise control and vacuum locks on
earlier cars, will rise and fall with the load on the engine as you drive. Your
heater control valve will go to "hot" when you accelerate and the airflow goes
to the defrost vents at the same time. Let off the throttle and a few seconds
later things start back to normal. It's safe to say that the check valve serves
a purpose.
You should be able to suck through one side, blow through it from the other
side. The side you can suck through goes towards the brake booster, and the
check valve sits between the booster and the little cross-pipe X fitting in a
short hose. That X fitting has the check valve on one port, a hose to the vacuum
reservoir (lives in the back of the driver's side fender well on US cars) on
another port, a hose to the flappy solenoid on another, and the hose that runs
to the center console for HVAC controls attached to the last port.
Bob
__________________
'89 S4 Auto, black.
===
A perfect tool for diagnosing is a Mityvac. I bought one and am very happy with it.
