Well not exactly, but I recently changed mine and learned some very valuable lessons that I have not seen mentioned before. If enough people do the same thing they will come across different problems.
First read the manual. After that here are some of the things I found. This applies to a non-interference engine.
1. Age. My belt failed by stripping teeth off a section. Prior to the failure I noticed an occasional whining sound. This was due to pieces of the teeth coming off and being ground up in the works. The belt failed with very few miles on it, but the car had been in storage for 15 years - so age is a factor.
2. Missing Idler - The early models did not have a idler wheel mounted in the water pump. This idler can be retro fitted to a new water pump and is a valuable upgrade. I lost a weekend trying to find someone that could clarify the differences. The idler does not contact the belt and only keeps the belt from back slapping on deceleration.
3. Water pump bolts - When installing the water pump I put a bolt in each hole - wrong. One of the holes going through the water pump housing is used by the center cover. Make a note of this when removing the pump and mark it on the new pump before installation. I did find that the bold can be removed without taking off the damper which is probably installed by the time one discovers this glitch. Simply loosen the cover and use a open end wrench and magnet to remove the offending bolt. I also used Teflon paste on the bolt ends going into the water pump. On inspection at removal I found them to be corroded. I also put a light coat of grease on the water pump gasket before seating.
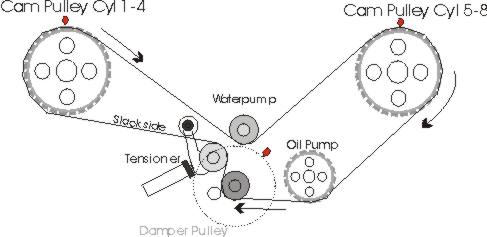
4. Cam Timing Marks - These can be difficult to locate the first time around even after looking at the manual. The cam gears have a very small 'V' notch on the back side of the gear. This was hard to see so I marked both the front and rear of the gear with a dab of red paint. This was very helpful later on when I was trying to avoid being one tooth off. The two alignment spots on the engine casing are also not that clear from the manual. The left side mark is on the distributor shaft casting. The mark on the right side is less obvious and is a little 'V' bump on the right side of the casting. I marked both these with red paint also.
5. Harmonic Damper - It is possible and quite easy to put the damper on backwards. This will throw out the valve timing and cause you to re-key the belt. On a non interference engine this just an inconvenience, but fatal on a 32 valve engine. Mark the back of the damper when removing. I also used some light paint to fill in the timing marks so they were easier to see and marked TDC with a little dab of red paint.
5. Tensioner Bolt - The bolt that holds the tensioner wheel on the tensioner arm goes in from the front of the engine with the nut towards the rear of the engine and car. Reversed, the length of the bolt is just enough to rub against the Harmonic Damper when the engine warms up. Turning the engine by hand or even running when cold will not cause contact. If the bolt is put in backwards the whole job needs to be torn down and started over to reverse the direction of the bolt.
6. Air Conditioner Clutch - Through age or contact the primary wire going to the Air Conditioner Clutch became frayed and would short periodically. Check this while you are looking around. I repaired mine with a crimp connector and some shrink tube.
7. Plastic Belt Covers - These can break if forced, especially the tabs on the back that hook over the cam towers. The inner cover behind the Damper was cracked on mine by one of the bolt holes. The bolt holes are reinforced with a metal grommet. To save the job of removing the crank belt gear I was able to use a bit of epoxy and a larger washer to secure the back of the shield. Be careful with the lower inside shield. It is possible to get the belt below the shield and still have the belt turn. This will make a chafing noise when turning the engine and cause the belt to track to the outside of the idlers. With the Damper on the mis-alignment cannot be seen. I found one of the easiest ways of getting the left cam cover off was to remove the power steering pump inlet coupling.
8. Adjustment - By accident I noticed that the adjustment position of the old belt was in exactly the same spot as the new one. By backing off the locking nut only half a turn it was easy to get back to the initial adjustments.
9. Miscellaneous - I used blue Loctite on all of the bolts except those for the water pump. I removed all of the spark plugs when starting the job. This takes only a bit of time and makes it much easier to turn the engine over when setting the belt tension. I also put a small dab of grease in the hole where the tensioner arm contacts the tensioner shaft. This is a wear point and worth some lubrication. I also used a bit of white grease on the shaft holding the tensioner. The plastic bushings were not worn, but were replaced anyway.
Pictures to follow - Car runs great!