I have had a problem with the electric rear hatch release for the longest
time, until I spoke to Dave Roberts over the phone yesterday.
Problem: motor engages, but does not release the hatch
turned out there was a poor alignment (and inclination angle) between the two
parts of the latching system. basically, the two parts were not parallel
enough (if such a position exists). Following Dave Roberts advice,
adjusting
the angle of the top part by inserting 2 pennies corrected the angle and
solved the problem.
thanks Dave, for your 2 cents advice .. literally
Tarek
86.5 Auto Indischrot
Hi Theo,
Nummer-----------Teil-----Stk-------Preis Auto Ahrens ( 2006 )
928 512 161 02----Riegel----1-------1,81
928 512 165 02----Nietstift--1-------0,61
928 512 163 02----Feder----1--------0,61
======================
Picture available upon request.
Hatch operation fix.
DISCLAIMER: Grab a beer, these instructions are for your reading enjoyment
only. Should you choose to follow these directions, you do so at your own
risk.
I performed this fix on Jason's hatch in about 30 seconds.
When I took my hatch latch apart, I looked at all of the pieces.
Trying to decide which part would be the least strong, the most likely to
wear or fail.
This was after playing with trying to adjust the hatch release to no avail.
First, look at the upper part the "tongue", look for any stress
fractures.
If you do have stress fractures, welcome to the club, so do I. I'm fixing
my tongue before I put the latch back in. "Somehow that just doesn't
sound
right ;o) "
If you upper latch is NOT cracked or broken:
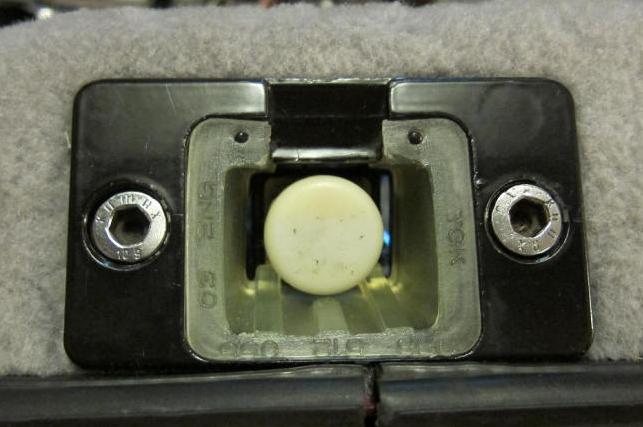
The upper latch has the catch in it. When the catch is moved sufficiently
far backwards, the latch releases and the spring in the lower piece lifts
the hatch above the point where the catch holds the hatch down. This is only
about 1/4".
By locating the motor mounting location further down the release cam pushes
the catch further in, to allow the release.
There is a ribbed rubber insert in the lower half of the latch that holds
the tongue in position allowing the release.
It is this rubber part that is the softest material and I believe the weak
link in the electronic operation of the hatch release.
The rubber either has shrunk with age or has worn down.
1. I simply cut a 1" by 1 1/4" shim out of a MOBIL 1 15W-50 plastic
oil
container. It's the thickness of the shim that makes this work, and I don't
even know how this this is, but it seemed thick enough. "Any brand oil
container will probably work as well and Mobil 1" ;o)
This piece is inserted between the rubber insert in the lower piece and the
rear of the lower housing. Long length horizontal and the short side
vertical.
2. Open the hatch, remove the tool kit. Loosen the two motor mounting bolts.
Move the motor up as far as possible.
NOTE: This step is to relieve stress on the tongue and hopefully prevent
stress fractures. CAUTION
3. On the lower part of the latch, push the rubber cup at the rear, forward
into the latch area. Slide the shim in between the rubber piece and the rear of the housing.
This slightly moves or holds the tongue forward so that the catch is moved
far enough into the tongue to release. Depending on the age and wear of your
particular hatch, additional shims could be placed in this area.
4. You can either tighten the motor mounting bolts at the top and test the
hatch. Followed by incrementally moving the motor mounting location down
until the hatch starts operating, or follow the shop manuals;
a. Close the hatch.
b. Crawl into the hatch area, with the hatch closed and move the motor down
until the release cam just makes contact with the catch.
c. Tighten the mounting bolts.
5. If the hatch fails to release with the motor adjusted to the bottom.
Start over again at step 1.
Ken Postma '86 928S
=========
Brian,
If the latch does lock ok, but the release is not working at all then there is a
wear problem with either the plastic lock or with the metal release mechanism.
Again: it will fix a release problem... Not a locking problem!
Its like this:
The little motor runs to move a lever that turns a little metal strip in a way
that it pushes the white plastic lock from its locking place and thus releasing
the hatch. Its either the plastic lock or the metal piece that pushes the white
lock down which causes the problem, probably due to wear of either or both
parts. (oh yeah.. First try adjusting by positioning the mechanism more up or
down).
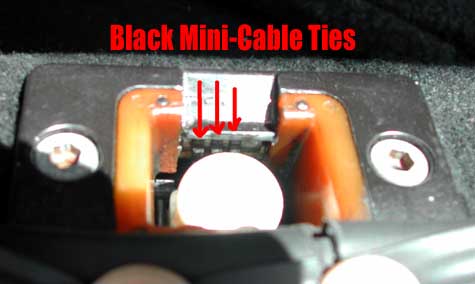
I made 3 little tie-wraps around the metal strip that pushes the plastic latch
down. You will have to take out the mechanism in the trunk to get to it, but it
is effectively 5 mins work or maybe 10 if it's the first time you do this. I
tried the same with sort of a jacket using a "poster" strip (plastic u-shaped
strip to hold a poster to the wall). That did last only a few month's though.
Tie wraps work a lot better. If the tie wraps ever wear you just put on new
ones.
If I'm confusing you or not very clear in what to do, please tell me, since I'm
trying to replace fairly common Dutch words by English descriptions here and
this might look ridiculous ;-))
Regards,
Theo
'88 928s4 cherry red
The Netherlands

=========
I have just changed my white latch piece. My symptom was the rear hatch not
opening - I think this is what happens when the white piece wears. I am not sure
that your problem (hatch not locking) is a symptom of the white piece wearing.
Maybe if it was completely broken, this would cause this.
Anyway, I found that I needed to remove the lock cylinder from the assembly.
There is a very small lock screw that you remove, then rotate the lock cylinder
about 20 degrees, then push. Once removed you can now withdraw the white piece.
Re-assemble in reverse.
Now, trying to spread the "rivet" head in the new pin is a problem. I am sure if
you had some sort of press you could do it. I tried the hole-punch and hammer
method; felt as though I would hurt something so stopped. I have left the pin
"floating" in there. With the grease applied, it has not drifted at all - I have
been checking.
I hope this helps . . .
Joshua Breckeen
Whitwell, Hertfordshire
email@jbreckeen.org <mailto:email@jbreckeen.org>
=========
>Since I bought my 928 a couple months ago, the power hatch release hasn't
worked--the mechanism seems to work just fine, but it doesn't succeed in
>releasing the latch. None of the moving parts look terribly worn, but all I can
figure is that the little cam that depresses the tongue of the latch is just
>barely worn enough that it won't depress the tongue far enough to unlatch. The
hatch also seems to squeak and rattle an awful lot when I drove over >bumps. As
far as seals, stops, etc. are concerned the only thing that seems to be worn is
the insert in the female part of the latch that looks like it was >carved out of
an ancient bar of hand soap, and is of similar structural integrity, i.e. it has
gone from somewhat crumbly to entirely disintegrated since I >bought the car. Is
the degradation of this insert related to either of my problems described above?
>
>Thanks,
>Joe Elliott
>'88 S4
Joe,
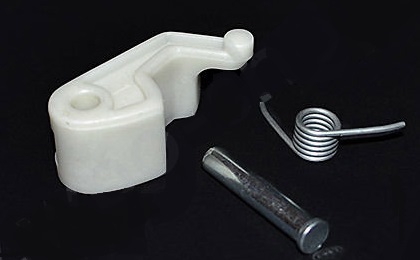
The first piece to replace it the plastic piece in the upper latch. They can be
ordered from Porsche and maybe the big three. Dave Roberts is a good source on
these small parts. Get the pin as you will have to drill it out to remove the
plastic piece.
What occurs over time is the plastic part wears causing the hatch to not latch
as tightly as new. Less tension keeps the hatch from pushing up enough when the
latch is released.
There are other issues such as adjustment, but unless the plastic upper latch is
almost new you will spend hours getting the hatch adjusted to release. And then
the hatch will probably not close tight enough to keep out the water.
If the latch wears enough the hatch can pop open when hitting a bump.
Dan the Pod Guy
Portia's Parts
============
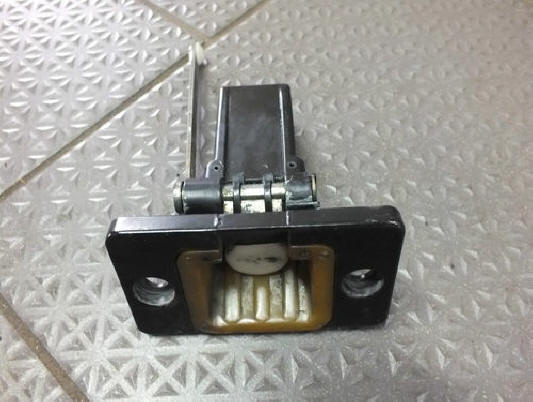
The nylon actuator on the hatch should be centered. Is the hatch release hitting
the nylon release completely? I used a magic marker to mark the nylon piece. I
then actuated the release to visually check if the striker was hitting the
release. Porsche used a plastic catch on the upper latch that’s designed to
wear. It’s a replaceable, but be sure to get the pin with it. The upper hatch
piece is cast and cracks, flexes and becomes inop. Check the sides of the upper
latch, often the metal of the latch gets a hairline crack on the side and
prevents the motor from releasing the catch. Shim about 1/16" between the rear
side of the male part of the latch and the hatch. This moved the lower end
toward the front of the car, so it works. Use carbon paper to see where it’s
contacting. When the catch is moved aft, the latch releases and the spring in
the lower piece lifts the hatch about Ľ" above where the catch holds the hatch
down. By moving the motor further down the release cam pushes the catch further
in, allowing the release. A ribbed rubber insert in the lower half of the latch
holds the tongue in position allowing the release. The rubber is soft, shrinks
and wears with age. I inserted a 1"x1Ľ" shim between the rubber insert in the
lower piece and the rear of the lower housing. Loosen the motor mount bolts, and
slide the motor up all the way. This relieves stress on the tongue and prevents
cracks. On the lower part of the latch, push the rubber cup at the rear, forward
into the latch area. Slide the shim between the rubber piece and the rear of the
housing. This moves the tongue forward so the catch is moved into the tongue.
Tighten the motor bolts at the top and test. Follow the manual by incrementally
moving the motor down until the hatch starts working. With the hatch closed,
move the motor down until the release cam just touches the catch. If the hatch
fails to release with the motor adjusted to the bottom, start over. The sheet
metal that the upper lock assembly bolts to gets bent so the black post is
pointed toward the rear. Shim to adjust the angle of the upper hatch mechanism
to point it farther back. This helps engage the lower mechanism and pop the
hatch. When the rear hatch lock breaks internally, to open the hatch crawl into
the rear, take the tool kit off, peel up the carpet at the center top section of
the panel behind the tool kit. Drill a Ľ”hole in the very center of the panel as
high as possible still on the main body. Then insert a screwdriver to push back
the white plastic latch on the black post. It helps if someone pushes down on
the hatch to release the tension. The carpet covers the hole. The internal cast
metal arm of the lock isn’t sold separately. Tried many adjustments without
success, until I read this tip: tape a piece of paper over the receiver; put
some grease on the tip of latch, and gently lower it until it makes a mark on
the paper. Note how far off center, and in which direction, the mark is; then
adjust the latch with shims until it comes down dead center.
Hatch release: The catch edge of the latch wears and prevents the hatch from
closing completely. With the remote release a small metal flap driven by a motor
pushes the catch back. The flap rotates 360° on each activation. This causes the
catch to clear the metal catch on the lower latch and then the spring in the
lower latch pushes the hatch up to clear the lower latch before the motor
releases the upper plastic catch. If there isn’t enough clearance due to wear on
the upper plastic catch it won’t release. Also if the latch or hatch is binding
then the spring doesn’t have enough strength to push up the hatch. Eventually
between the flap wearing into the plastic catch and the top edge wearing away
the flap cannot push the catch far enough back to release the hatch. There are
several fixes for this, but the best, easiest and most reliable way is to
replace the plastic catch in the top latch. Check that the fasteners are tight
on both the top and bottom part of the latch. There are two adjustments that may
be necessary. Remove the tool panel. Loosen the two 10 mm bolts that hold the
hatch release, and have an assistant trigger the release. Slide the release down
until it begins to drag at the bottom of the cycle, and slide it up until it’s
just free. If this doesn't cure the problem, loosen the fasteners holding the
top latch to the hatch, and insert spacers under the outer edge so that the
latch is tilted forward. Make sure that the alignment allows the latch to enter
the receptacle cleanly. A used rear hatch rubber (plastic?) liner solved my
hatch problem where the hatch lid was squirming around and squeaking like crazy.
The liner deteriorates and cracks with age and eventually goes to pieces. With
all the other hatch problems that develop with age, a new unit the makes the
most sense. My symptom was the rear hatch not opening. I removed the lock
cylinder from the assembly. There’s a small lock screw to remove, and then
rotate the lock cylinder about 20°, then push. Once removed you can withdraw the
white piece. Trying to spread the rivet head in the new pin is a problem. If you
had some sort of press you could do it. I tried the hole-punch and hammer
method; felt as though I would hurt something so stopped. I have left the pin
floating in there. With the grease applied, it has not drifted at all.
Hatch motor won't park is usually the release motor is running so freely that it
coasts over the cutout that should stop it. Possible cures:
1. Clean the cutout. Sometimes, there will be a build-up of copper on the disk that bridges the cutout, allowing just enough power flow to keep the motor running.
2. Pack the gearbox with grease, adding enough drag to slow the motor down so that it won't coast over the cutout.
3. I haven't tried it, but I would think that adding a power resistor in the run-on line before the motor might slow it down enough to solve the problem. Perhaps two ohms, 25 watt from Radio Shack?
4. Replace the
unit!
Jim Mayzurk
93 GTS 5-spd