Pod removal
I have removed mine several times, and have yet to have to remove the
multifunction switch. Once you remove all 4 bolts (two LONG hex head and
two regular bolds) pull the pod forward and slide it over the ignition.
Once you have done that, you can reach in behind the cover and remove three
electrical connectors to the gauge pod, and slide it out over the dash and
under the gauge pod. Be careful not to loose the 4 aluminum and rubber
grommets that hold the gauge pod in with the long hex bolds. After you do
this, the gauge disassembly is simple. I even replaced my odometer gear
last time I was in there.
-----Original Message-----
From: brent wessner [mailto:user107090@aol.com]
Sent: Wednesday, January 05, 2000 2:52 PM
To: 928
Subject: [928] Pod removal
Hi all,
Well here we go, it's time to start on the electrical on my car, I have
traced the wiring on my 1984 928S for the temp gauge to the pod and it
looks like it may be the gauge. My question for today is how does the pod
come off of the column? I see two bolts but does it slide off of the ign
lock? I have the steering wheel, lower cover and multi function switch
removed-what next? thanks for the help
Brent Wessner
1984 928S
"bringing it back to life saga"
==========================================
Brent,
Having recently performed the task for similar reasons, I will add a few
thoughts. There are 4-10 mm bolts to remove the pod. This after
removing
the steering wheel, turn signals and relate covers of coarse. On my '80
928
you can not remove the lower right side bolt because it is directly over the
ignition switch, which is a significant and unmovable subframe assembly.
All is not lost, looking carefully there is a Philips head screw on the
subframe that releases an arm on this bolt. Upon its removal the
connection
is released. The two long bolts actually hold the pod in place via large
rubber bushings. Just another thing not discussed in the service manuals.
Be gentle with the cluster it is all plastic and can be brittle.
Two suggestions, Now is a good time to replace the bulbs in your cluster.
They are many, but they are cheap. I would also give a good look at
your
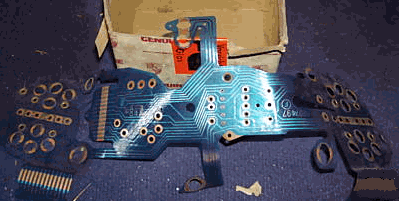
printed circuit board. Instrument malfunctions can start hear as well and
include the fairly flimsy connectors to plug into the harnesses.
I have also recommended the use of a good small cosmetic mirror to help you
locate the bolts, unless you like hanging upside down all day.
Ed B
============================================
Removal of the pod is fairly simple. The instruments are not bad
to remove
from the pod, and the board....well it does not require soldering....just
caution.
1) remove the lower cover with 2 screws
2) remove the lower cover of the steering wheel...one screw and two bolts. Careful when removing it though....it sticks between the cruise and wipers.
3) remove the two alan head screws on either side holding the pod down. One is beside the ignition cylinder, the other is harder to see. Located farther to the rear on the door side...further up also. It is a longer shaft....5 inches or so, but only threaded at the top.
4) Once these are removed, slid the pod cover forward, and lift the rear.
You should be able to remove the three connectors on the instrument gauges
and slide it out from the rear.
The rest is up to you....fairly obvious though....any questions, E-Mail me.
Robert
'83 928S RMB
=====================
Bob-
This is a piece of cake. Remove the horn pad, then the steering wheel. Pop off a couple of screws holding the lower trim piece on then unplug the conectors for the stalk assembly and locate a couple of 10 mm bolts holding the front portion of the Pod - remove the stalk assembly it. Then find the 2 6 mm hex head blots and remove them. Loosen the Pod and move aft - just enough to unplug the electrical connectors (all 3). Once this is done, carefully wiggle the Pod off and be careful - the Instrument Cluster is not attached to the Pod!
btw - I have found it is easier to perform a Pod removal if the Drivers seat is not installed.
Good luck - and hth-
Jay
87 S4 Auto
==========
> I've noticed that my pod wiggles in a left-front to right-rear motion. It's only attached to the steering comun by three bolts. Two up front an then one on the left-rear. At the right-rear is a shorted bolts that holds the cluster to the pod. While laying under the dash, contemplating oil prices, Bush politics, crushing snow and whether wheels actually do fit, I noticed a hole in the column assembly near the lock tumbler.
> Is there supposed to be a long (5"?) bolt holding that corner of the pod tight?
>
> Do have the car back in one piece after the winter track prep/pennance.
> Going back to the car chiro next week for an adjustment. They didn't quite get the lower A-arm front mounts in the right spot after my wreck.
> Glen
> '80 Euro S
Glen,
dunno if my 88 s4 is different from a 80 euro-s, but I recall the right side
having a bolt too, but also having an aluminum block attached to it that is "Z"
shaped. It bolts to the pod, and another bolt links it to the frame. It attaches
to the pod by a M6 bold running through a sleeve like on the left side.
Parts Illustration 906-01 shows only the left side however. Mine definitely has
a bolt on the right side too.
regards
Theo
1988 928s4 cherry red
www.928s4.tk
==========
Glen,
I guess since I am the "Pod Guy" I should know this information.
The pod is mounted on an aluminum frame attached to the steering column.
There are four mounting points two on the left and two on the right.
Towards the front of the pod - the surface facing the driver there are two small
bolts that hold the front of the pod in place.
Towards the rear of the pod there are two longer bolts holding the pod and the
instrument cluster in place. On the early cars these were long six millimeter
bolts, on the newer cars they are cap screws.
The bolts go into a threaded bushing on the pod. The bushings are made of
aluminum and can strip out the threads if over tightened.
The bolts holding the rear of the pod use spacers to hold the instrument cluster
in place. The spacers (2 each side) fit into a slot on either side of the
instrument cluster. If one of the spacers is left out is it possible to over
tighten the long bolts and force them through the surface of the pod
- not a good thing to do.
On the key side of the pod there are two bolts that work together to hold the
pod in place. On goes through the hold in the key housing and attaches to an
offset metal bracket. Another bolt longer bolt goes through the bracket and into
the pod. It sounds like you are missing the shorter bolt (a cap bolt about two
inches long) that holds the bracket in place. The combination of the bracket and
the two bolts provides a pivot point for adjusting the pod to fit nicely around
the ignition key.
On some years, there is a vinyl loop with two brass grommets that attaches under
the left rear bolt. The vinyl loop is designed to go around the wiring harness
and hold it in place. It is difficult to get the vinyl loop in place while
attempting to get the pod balanced and bolted down. Most cars the loop is
missing. I generally discard it and substitute a tie strip.
You will find it easier to remove the pod with the steering wheel off. I
generally remove the steering wheel and loosen the bolt holding the column
switches. The pod when installed correctly with all of the hardware can still be
crooked. This often results from the aluminum frame on the steering column not
being level. The tilt can be adjusted by loosening the three cap bolts holding
the steering column under the height adjustment lock. The pod can then be tilted
to level and the bolts retightened. The same mounting point for the column has
spacers that can be added or removed to better position the pod and allow it to
be adjusted up and down easily.
A little oil added to the adjuster and the slide works wonders to the smooth
operation of the pod.
A couple more interesting points. The two rheostats under the pod are not the
same. They cannot be substituted. The one for the headlights has a coil the
other one does not. There is a hole on the left side of the pod that can be used
to mount a button similar to the one for the high intensity washers. I mounted
the same button and hooked it up to a garage door opener. No more putting the
opener on the sun visor and having it fall off
or damage the leather/vinyl on the visor.
This is probably more than you wanted to know.
Dan the Pod Guy
Portia's Parts