Next step: the resistor pack it-self.
There are four spiral like resistors mounted on the assembly.
They are 2,5 / 1 / 0,4 / 0,25 ohms. The resistors are switched by the dashboard fan control switch.
Fixed the Magic Blower Syndrome. Easy job !!!
This is what I did:
I pulled off the rubber weather-strip/seal at the top of the firewall
(firewall to hood seal). Now you can pop up the front of the big plastic
drip pan and pull it out (the back of the drip pan fits under the cowl on
tabs - no screws).
Under this plastic drip pan is the blower motor (on the passenger side),
the black plastic evaporator housing (in the center), and the windshield
wiper motor (driver's side).
Now, at about the middle of the car, just to the passenger side of the AC
lines, you'll see a black, rectangular electrical connector, maybe 3/4" x 1
1/2" at the end of a wiring harness, plugged into the evaporator housing.
Unplug this connector. It's a 7-pin connector I believe, and when you unplug
it, you're looking at the back of the resistor block/pack. It's held inside
the black plastic evaporator housing by 2 screws on opposite corners.
The only problem is, the darn thing on the other side of the rectangular
hole is too big to pull out through the hole! If you don't believe me, try
it.
But.... if you are a bit thin (skinny?) you can open the boot that connects
the blower with the evaporator housing, and reach in the housing with your
hand.
Yes: it can be done(!) ...but big hands and arms are no help with this job.
Find someone to help you if required. Keep the top screw loosely in.
Grab the resistor assembly inside the evaporator housing. Then have
someone unscrew the last screw while you hold the resistor pack in your
hand.
When the last screw comes out, gently move the resistor pack out through the
boot opening.
Next step: the resistor pack it-self.
There are four spiral like resistors mounted on the assembly.
They are 2,5 / 1 / 0,4 / 0,25 ohms. The resistors are switched
by the dashboard fan control switch.

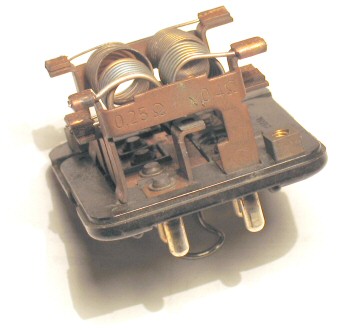

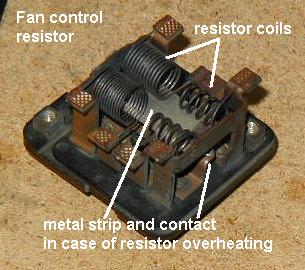
Underneath the resistors is a bi-metal strip mounted that bypasses
the resistor pack and connects full 12v to the blower motor.
It activates when a certain temp is reached and triggers cooling down
the resistor pack by the produced airflow. Also by bypassing the resistors
the resistor heat dissipation stops.
I tweaked the Bi-Metal strip to open approx 2 mm.
Also I moved the spiral a bit away from the Bi-Metal strip (it almost
touched the bi-metal!!!)
Then I tested it on a power supply heating up the 2,5 coil. Works fine now.
Finally: re-assemble everything again.
Easy !
Have fun.
Theo
'88 928s4
related:
Van: <mlschmidt@sprintmail.com>
Aan: <Jenniskens@wxs.nl>
Verzonden: dinsdag 8 februari 2000 6:39
You've got what's referred to as Magic Blower Syndrome. When the resistor
controlling the fan speed gets too hot, the blower kicks up to high to
cool it so that it doesn't burn out.
I'm a former Magic Blower Syndrome sufferer myself. After spending
probably way too much time working through various issues of this problem,
I think I've got things pretty well sorted out. In my case I did not have to
remove the blower to change the resistor pack. It would take me maybe five
minutes to get mine out now that I know how to do it. Below is the
information I sent to someone once before that also had the problem:
Apparently this problem is pretty common. The fan speed is controlled by a
resistor pack that is located in the engine compartment of the car. It's
under the plastic cover by the firewall. When the resistor controlling the
fan speed gets too hot, there is a thermal switch that kicks the fan on
high speed to cool off the resistor with more air flow.
Several things can possibly be causing the switch to kick in. The switch
may be more sensitive due to age or something. The blower motor may be
worn, or have debris or something causing it to drag. This causes it to
draw more current and the resistor to get hotter. There is a rubber sleeve
that connects the blower housing to the plastic housing that the air flows
through. If this rubber sleeve isn't on right, it will allow air to escape
instead of going through the housing and over the resistor pack. Less air
over the resistor pack means less cooling and it getting hotter,
potentially triggering the thermal switch. There is also a small plastic
cover on the top of the blower motor housing. Mine wasn't on tightly. This
also may also allow air to escape and decrease the amount of air going
over the resistor pack.
The first thing that I did was to replace the resistor pack with a new one.
The new one made things even worse. The fan was going to high much more
often, even when it wasn't that hot outside. I really didn't notice if the
rubber sleeve I mentioned above was on properly all the way around when
this was happening though, since it was kind of hard to get at the bottom
part of it. That loose small plastic cover on top of the blower motor
housing hadn't been discovered at that point yet either.
I took the new resistor pack back and put the old one back in. Before
putting it back in, I bent open the gap on the points for the thermal
switch by about 1mm. I also noticed that the resistor coil that controls
the slowest fan speed was touching the thermal switch strip. I bent the
coil up just slightly so that it wouldn't touch anymore. When the resistor
block was in I made sure that the fan turned freely by hand (it did), and
that the rubber sleeve and plastic cover were properly installed. Since
then fan speeding up hasn't happened even once since.
The newer model cars have a redesigned resistor pack. Looks like this
started with the '90 cars. The resistor that controls the lowest fan speed
on it has .5 ohms less resistance than the one on earlier cars. This
should mean it will heat up a little less, and also that the slowest fan
speed is a little faster than on the earlier cars. The faster speed means
more cooling of the resistor. The thermal switch part has been changed
too. Instead of the long metal strip, it's now a smaller blue plastic
looking
piece. If the resistor does get to hot, it will stop the fan until things
cool off, instead of switching it to high speed. Not really noticeable,
and much less annoying than the unexpected blast of air from the fan
going to high.
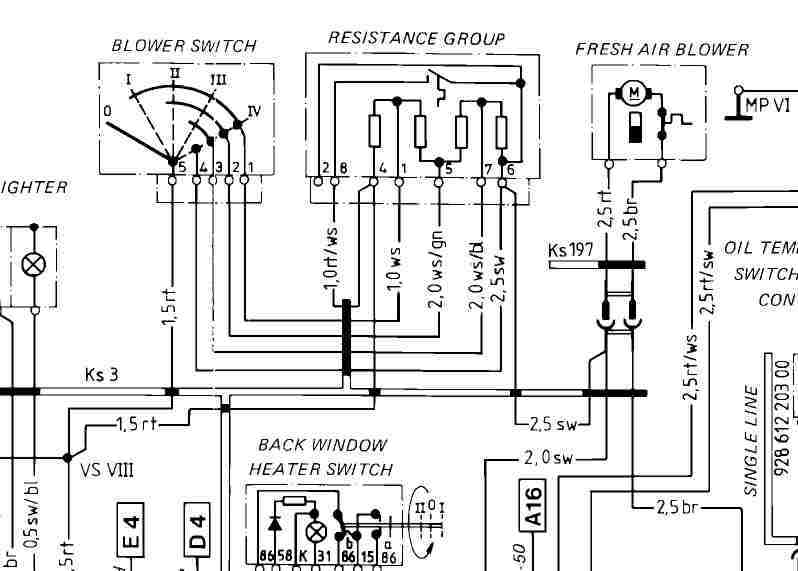
It looks like the newer style of resistor pack should be able to be used
in earlier cars, but the connector that goes to the resistor pack must be
modified. The cover of the connector snaps off revealing the wires and
round hollow terminals. On my '88 car, the terminal that is in the #8
position would have to be removed from it's spot and taped up. There are
two wires going to this terminal. They both remain connected to the
terminal, but the terminal isn't used. Next the terminal that is in the #6
position is moved to the #8 position, and the connector's cover snapped
back on. According to the wiring diagrams in the shop manuals, this makes
the wiring the same as that on the '90 and up cars that use the newer
style resistor pack.
Now that I've told you much more than you probably ever wanted to know
about your fan speeding up, I'll attach a post on the procedure to remove
the resistor block that was written by Tom Green. When I did mine, it
wasn't anywhere near as involved as he stated below though. I slipped the
rubber sleeve off of the junction between the blower housing and the
evaporator housing, and was able to get my hand in through the opening to
reach to the back of the resistor pack and remove it. Loosening the three
screws that hold on the blower housing my give you a little more room if
you need it without actually taking the blower completely out. An
assistant with smaller hands might come in handy too. Good luck.
Mike Schmidt
'88 928S4 Black/Black "PORSCHE" cloth
928 Owners Club Charter Member
----------------------------------------------------------------
From: Tom Green
Here's the procedure I used to replace my resistor block, or pack, or
module, whatever you want to call it. Porsche calls it "Switch (Thermo
Bi-Metal)" on the 928S 1983-1986 parts micro-fiche (Group 8, 13/30, item
#41, if anyone's interested). It's part # 928.618.101.01, and I got mine
from DEVEK for $67.50.
OK, first you have to remove the hood. Disconnect the 2 hoses and 1 wire
from near the passenger side hood hinge. Place plenty of padding over the
engine compartment and fenders to protect your paint in case you slip. Mark
the position of the 4 bolts holding the hood to the hinges to make
re-installation easier. Then, (this takes two people) have someone hold the
hood while you undo the hood shocks and then the hinge bolts. Carefully
lift the hood off and put it in a safe place. It's pretty light since it's
aluminum - the wife can help.
Next, pull off the rubber weather-strip/seal at the top of the firewall
(firewall to hood seal). Now you can pop up the front of the big plastic
drip pan and pull it out (the back of the drip pan fits under the cowl on
tabs - no screws).
Under this plastic drip pan is the blower motor (on the passenger side),
the black plastic evaporator housing (in the center), and the windshield
wiper motor (driver's side).
Now, at about the middle of the car, just to the passenger side of the AC
lines, you'll see a black, rectangular electrical connector, maybe 3/4" x 1
1/2" at
the end of a wiring harness, plugged into the evaporator housing. Unplug
this connector. It's a 7-pin connector I believe, and when you unplug it,
you're looking at the back of the resistor block/pack. It's held inside the
black plastic evaporator housing by 2 screws on opposite corners. The only
problem is, the darn thing on the other side of the rectangular hole is too big to pull out through the hole! If you don't believe me, try it. If you
can undo the two screws and pull it out of there, you'll save yourself a
lot of work. I couldn't. In fact, if you can get it out this way, you don't
even need to take the hood off. But you can't, so I'll go on...
The next step is to remove the blower motor so that you can reach into the
evaporator housing and get the resistor block/pack. I couldn't get my
blower motor out without first taking off the cowl trim piece. In order to
do that, you have to do the following:
Remove the windshield wiper arms, pop off the two windshield molding strips
on each side of the windshield (slide joining clips at top corners up to
expose joint). This will expose a screw on each end of the cowl piece.
Remove these two screws and the two bolts near the hood area. Carefully lift off the cowl piece and put it in a safe place where it won't get
stepped on.
Now you can get the blower motor out. It's held in by three screws. I had
to remove the passenger side hood hinge completely to get at the first
screw. Another screw is hidden inside the mouth of the blower. You have to
pull back/remove the rubber mating piece between the blower motor and the
evaporator housing to get at it. The third screw is under the dash/glove box
area. You have to remove the under dash tray to get to it easily. After
removing these three screws, you can disconnect the wiring connector and
remove the blower motor.
Now(!), you can look into the evaporator housing with a flashlight and see
the resistor module. Reach in and grab it and undo the two screws holding
it in and remove it. Install a new one the same way and put everything back
together.
=====================
At 11:11 PM 4/9/01, Ed Scherer wrote:
>OK, I've heard of "magic blower syndrome", where the blower fan
only seems to have two settings, off and high (a problem with the "bimetallic resister/switch do-hickey"), but I've got a slightly different problem.
>It's "intermittent blower syndrome", where the blower just
sometimes doesn't work, regardless of the fan setting.
Well, not exactly. "Magic blower syndrome" is a condition whereby the
HVAC
blower will suddenly go from low speed to high speed, stay on high for a
moment or two, then go back to low speed. This is as designed, in a sense.
The blower switch sends power to one of several wire resistors in a pack
inside the blower plenum. The varying resistance sets the desired fan
speed. Porsche worried that the resistor pack might overheat at low fan
speeds (high resistance), so they included a thermal switch that by-passes
the resistors when the pack gets too hot. This kicks the blower on high
speed, which blows more air over the resistors, cooling them. When they
cool down, the thermal switch opens, returning the blower to the switched
speed. Sometimes, the thermal switch is too sensitive, so the blower speeds
up far too often. One fix is to pull the resistor pack and tweak the
thermal switch by bending it.
>The blower worked for most of the winter, but now rarely works. It sometimes works in the morning when it's cool, but does not work more often than not now. With my black interior and hot, humid weather
approaching, I'm going to need to take care of this pretty soon.
One major suspect is relay XII, the blower relay. Try swapping relays XII
and XIV (defroster). If the blower now works and the defroster is quirky,
buy a new relay.
If that doesn't help, take fuse #20 out and put it back in three or four times.
Wally Plumley
928 Specialists
========================
Oscar,
I did this long time ago, so I hope I recall everything:
First: you DON'T need to take off the hood!
Peel off the rubber lip which holds down the black fan cowling and carefully pull the cowling out to expose the "area of interest".
The resistor block is visible from it's connector-side, sticking out from an air duct. The problem is that the opening is not large enough to take it out, though. Place a shop rag to prevent the bolts from getting lost. Take off the connector and loosen the bolts ( I think there were two) There is a rubber sleeve which connects the blower motor to the air duct. Pull this sleeve to the side, far enough to get the resistor block through. Push a wire through this opening and hook it to the resistor block to pull it out. The new block goes in the same way, using a second wire hook to pull the block into it's place.
The rest should be straight forward.
One word of caution: the anti-ice-ing capillary of the A/C is pretty close to the fan resistor block, be sure not to bend or break the capillary when working on the resistor block. BTW: Don't throw away your old resistor block. It is normally corrosion of the bimetallic switch that causes trouble. Cleaning these contacts makes it ready for a new go once the "new" switch fails ;-)
Hope that helps
Kurt
90 S4 Auto
===========
And all things old are new again...
From 17 July 2003
"Magic Blower Syndrome" refers to the operation of the safety system built into
the HVAC blower system. The blower speeds are controlled by a multi-position
switch that routes blower power thru an array of Nichrome wire resistors that is
mounted in the blower plenum under the hood.
At low speeds, the resistors generate heat, and if the heat build-up gets
excessive, it could overheat the plastic plenum, causing a fire. Porsche put a
thermostatic switch in the resistor pack to prevent overheating.
Up thru '88, if the heat build-up in the resistor block gets excessive, the
normally-open switch closes, applying full voltage to the fan, bypassing the
resistors. The combination of more airflow and no heat generation for the
bypassed resistors will quickly reduce the temperature of the resistor pack. The
switch opens, and the blower goes back to the set speed.
After '88, the normally-closed switch opens, cutting off blower power completely.
After the resistor pack cools, the switch closes, turning the blower on again.
(The blower will still work on the highest speed, if changed manually.)
If your blower works on Defrost, but not on heat or A/C, the problem could be in
the resistor pack or in the control head - assuming that the fuse and the blower
relay are really OK.
Wally Plumley
928 Specialists
;-)
Wally