|
|
|
|


How I got my AC back to cold from just
cool.
Sorry about the picture size but bigger is better in
this case.
Please let me know if this
helps anyone or if something needs adding or changing.
Graham
So here's the symptoms:
1: AC seems to work ok as
long as the outside temp is less than 25ºC.
2: The warmer it gets outside,
the warmer my AC gets.
What you will need:
8mm
socket
10mm socket
Philips screwdriver
short handled Philips
screwdriver
Elastoplast
1 mate with small hands
What I did:
After speaking to a few people I came
to the conclusion that I must have quite a few problems here all contributing to
the main one. Firstly I was sent a copy of the HVAC layout which turned out to
be not much use, as I seemed to have different colour pipes, but this might not
always be the case. Either way it will give you a rough idea of what is going
on.
Click here for HVAC layout in new window.
Behind the air
filter box is a AC pipe which in my case was very cold, this being the case then
I'm thinking that the problem has got to be somewhere under the dash (most of it
was, but not all as I found out later)
So after trying in just about every
motor spares shop for 20 miles and still hadn't been able to buy a vacuum tester
(why does nobody sell them over here?) I decided to try this without.
With
the engine running I removed the pipe off the check valve between the brake
booster and the 4 way connector. I had a good strong vacuum going in to the
check valve.
The vacuum coming out of the check valve was a lot weaker. So problem number 1 is found and at the same time the
biggest piece of luck happened. My check valve vibrates quite fast if it is just
sucking air and there is no vacuum. I don't know if this is normal but I decided
not to clean it with carb cleaner, in case it stops vibrating, and just buy a
new one. So now I've got myself a mini vac tester.
I then disconnected all
the lines off the 4 way connector except the one coming from the brake booster
(with my mini vac tester in line) and plugged the other 3 holes on the 4 way.
The check valve stops vibrating so I know the 4 way is not leaking.
Then I
connected the brake booster line (with check valve) directly to the line going
to the vac tank with a piece of rubber tube. After waiting a few minutes to
empty the vac tank my mini vac tester is still vibrating, but not as much. When
I disconnected the vac tank line I heard the air rush in so figured it must just
have a slight leak and I'll come back to that later. Problem number 2 is now
found.
Then I connected the brake booster (still with check valve) directly
to the black line going to the AC. After 5 mins of coffee drinking my little vac
tester was still vibrating violently. So I must have a vac leak somewhere and
I'm hoping its only the hot water valve as this is quite easy to get
to.
There are only 2 10mm bolts holding the air filter on so I removed it and
disconnected the white line from the hot water valve. There was virtually no
vacuum on this line so the hot water valve would have taken forever to close. I
decided to replace the valve anyway as its only about 10 mins work.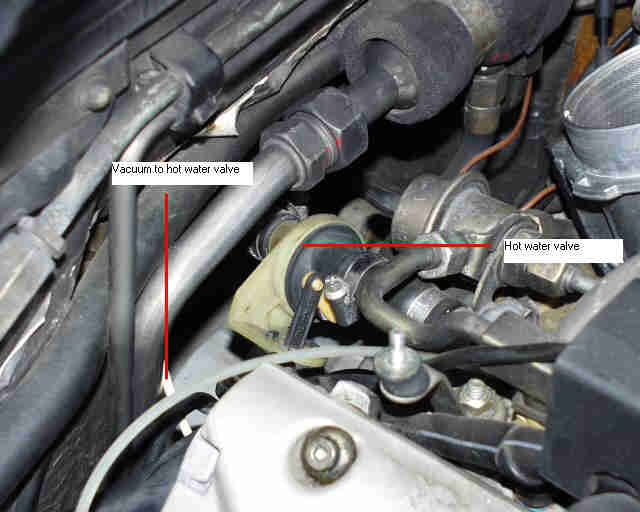
Now what I
was dreading has just happened!! The leak must be behind the dash
somewhere.
With the engine off I decided to remove the centre console side
panels and with a bit of luck it might just be a loose connection behind the
radio. If you have never removed these before its quite simple. There are 2
screws hidden in the carpet on each side panel and with these removed they just
slide out.
With the side panels out you will be able to see where all the vac lines
meet up. Sorry but I don't seem to have taken a picture here (anyone got one?),
but they are right at the back (see pic above).
While I was at it I thought I
might as well check the servo motor and the inside and outside temp sensor
setup.
The servo motor is behind the parcel shelf on the drivers side, sort
of above your right knee but further towards the front of the car. Some people
at this point decide to take out the seats but to me it just seemed like more
work for nothing.
This position worked for me.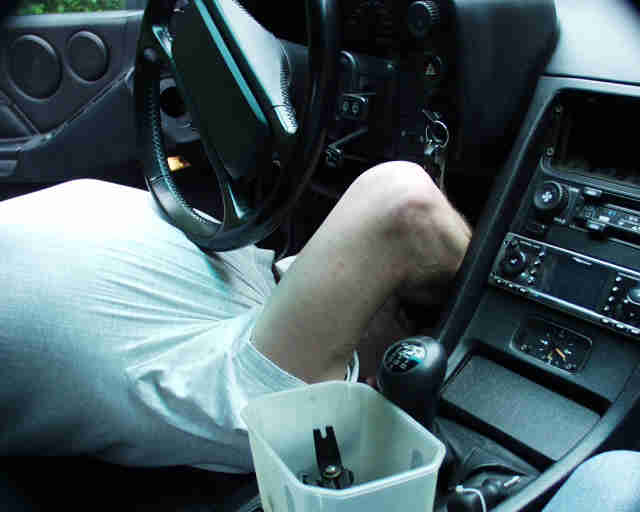
There are 4 bolts holding
the parcel shelf in (2x 10mm 2x 8mm)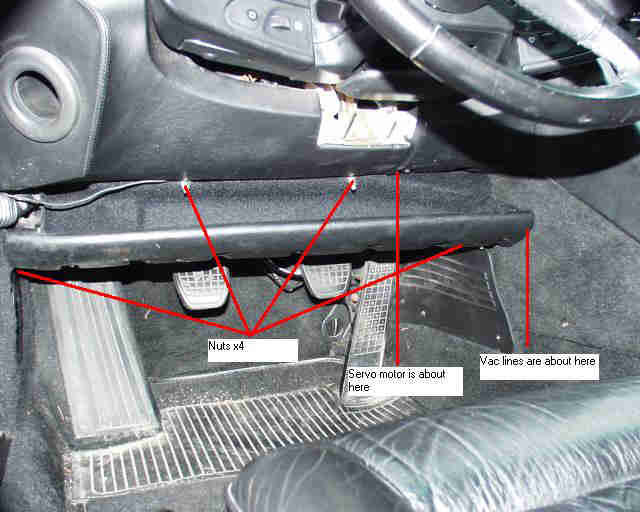
When the parcel shelf is
removed you should be able to see the servo motor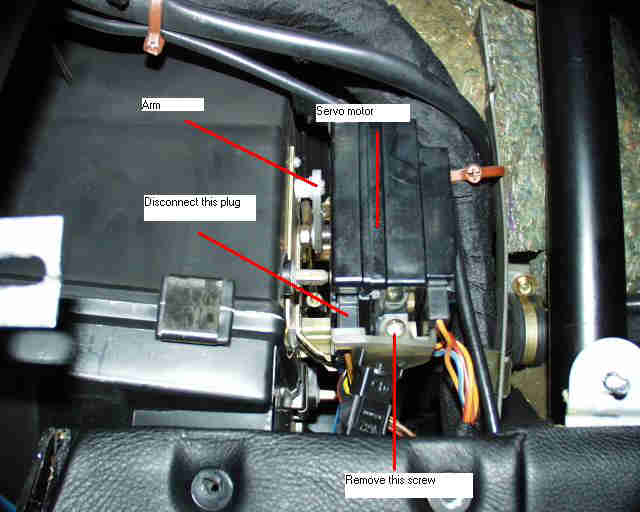
The servo motor has a little arm
which controls the temperature mixer flap. If the arm is all the way up, you get
max heat; all the way down, no heat. Normal position with the inside temperature
stable is roughly horizontal. I turned the ignition on and moved the temp slider
to see if it was moving ok. The motor being ok I moved on to the temp
sensors.
Here you will need an ohmmeter.
Disconnect the plug nearest to
the arm (after removing screw). Pin 4 connects to the outside temp sensor (in
the air duct to the alternator), which connects to the inside temp sensor
(behind the slotted fitting in the dash next to the glove box), which connects
to the temperature control slider. According to the manual, the resistance
between pins 4 and 12 should be about 3.7Kohms with the slider at 18, and about
4.7 Kohms with the slider at 30. If there is a break in this circuit or the
resistance is nowhere near these values, then you have probably got a faulty
temp sensor. The inside temp sensor has a small fan behind it to draw air in.
The fan can be tested by putting a lit cigarette near the sensor to see if its
drawing air.
With all these things checking out ok on mine I moved on to the
vac system.
With the side panels and parcel shelf removed you can see the
vacuum manifold behind the radio. There was nothing loose here so on with some
vac diagnostics.
I disconnected the black line which is the main vac feed and
plugged it. Having restarted the engine I went outside to see if my "mini vac
tester" was vibrating. No vibration on the check valve so I know that the vac is
ok up to this point.
I then connected the black line to the white line and
moved the sliders on the AC unit to different positions and checked my "vac
tester" for vibration. With the check valve not vibrating everything was looking
good, so I checked the hot water valve and sure enough it was opening and
closing as it should do.
I then repeated this with the green vac line
(defroster flap) and I could hear the flap move plus my "vac tester" was not
vibrating.
So with the green one checking out ok I moved on to the blue one
(fresh air flap). This was the one I was expecting a leak on but not looking
forward to having to replace.
Woohoo the 2nd piece of luck I've had so far.
Yet again I can hear the flap close plus my tester says all is ok.
If you
have a problem with the fresh air flap then see Tony's
tip.
Then I moved on to the orange line (comb flap behind centre vent)
but this time my "vac tester" keeps vibrating.
So I've found one leak but
I've still got one more to go.
Finally the yellow line (footwell flap) and it
appears I've got another vac leak.
So the verdict so far is that I have got a
vac leak on both the comb flap and the footwell flap actuators and/or the pipes
supplying the vacuum to them. So its on to removing the centre console.
I
thought this was gonna be worse than it actually was but it wasn't that
bad.
With the side panels already out remove the 2 screws at the window
switch end of the console (1 each side) and the 3 under the dash (2 drivers
side, 1 passenger side). Remove radio. Remove inside of ashtray. Gently pull out
the centre vent with your finger and remove the 2 bolts above the vent (see
pic).
Remove glovebox (4 bolts inside, 3 underneath), disconnect air feed to
glove box if you need to. Remove bolt securing centre console from inside
glovebox (see pic).
Bearing in mind that this is a manual 928 the gear stick boot
will just lift up if you pry it a little. If you haven't done it already this is
a good time to get a mate with small hands!
Disconnect AC unit plug, the
clock, cigar lighter, ashtray light and any other connectors that might cause a
problem. The window switches etc can be unplugged at the rear of the console
behind where the radio was.
GET ELASTOPLAST READY!
The console should now
come out with a bit of gentle persuasion. BE CAREFUL NOT TO BREAK ANYTHING
BEHIND INSIDE TEMP SENSOR.
I reconnected the black vac
line directly to the yellow line as before and restarted the engine. With my
mate outside checking my tester for vibration I removed the yellow line from the
actuator and plugged it. The check valve stopped vibrating so the leak had to be
in the actuator itself. This is a bit of a pain to replace so its easier just to
change the rubber diaphragm inside. With the new diaphragm in place it was time
for another vac test. The actuator arm moved instantly and my "tester" stopped
vibrating.
Click here to see the small slit in the diaphragm that caused
the leak.
This only left the comb flap (centre vent) actuator so I plugged
the line and confirmed that it was the actuator that was leaking and not the
orange line.
There's a great short cut on replacing the rubber diaphragm on
Tony's
site, as its worse than the other one to replace the whole thing, but I
decided just to plug the orange line as the comb flap doesn't actually do a lot
(plus the OPC didn't have a replacement at the time) I'll probably do it one
day.
With this line capped I then connected the vac lines back to their
correct positions on the vac manifold. This time all flaps are moving correctly
(except comb flap obviously), the hot water valve is closing and best of all my
mini vac tester is not vibrating anymore. I still cant believe how lucky I was
too have a check valve that did this!
So with the doors closed, the engine
running and Elastoplast on finger (trust me you'll know why if you have to do
this!) it was time for the real test. I pressed the AC button and instantly I
heard the flaps move and the air flow pick up. Most importantly I had the ice
cold AC that I used to have before. All that was left was to put everything back
in place and I was done.
With everything back together I then decided to
blast the front of the radiator with compressed air which cleared out all the
usual dead animals and things that these cars collect along the way ( I once had
a tangerine behind the air filter box)
The
conclusion
With the vac leaks in the AC system the fresh air
flap was failing to shut off the flow of outside air. The hot water valve was
also failing to stop the flow of hot water from the engine entering the heater
core. When the air from outside mixed with the air from the heater core and the
cold AC air, I was getting warm AC. This would probably explain why I was
getting steamed up windows when I first started the car.
Although I've
completely sussed out the workings of the HVAC, I couldn't have done this
without the initial advice of others (thanks Wally and Theo) and by spending a
lot of time reading some great sites like Greg's, Tony's and Theo's. But most of all a big thanks to Karl who has got small
hands and better eyes than I have (even though he does drive a BMW).
Hope
this helps some people out with their AC problems and maybe one day I'll put all
this stuff on its own site.
If anyone has any questions or whatever then feel
free to contact me.
Graham